
How-tos
EEG How-to
If you have suggestions on how to improve this document, or find mistakes, please send them to ilslabs@nulluu.nl
Introduction
This How-to contains all the relevant information for preparing, piloting and running an EEG study in our labs.
For a shorter checklist that you can use while running your experiments see:
Before you start
- Access to the EEG lab is restricted. Contact Marijn Struiksma for details.
- Read the Introduction Guide to ILS Labs and follow all the steps there.
- You can reserve the EEG lab through the Reservation System.
- For details on opening hours, see this page.
- The lab is primarily meant for running experiments; you are expected to do some of your experiment preparation, and all of your data analysis, on computers outside the lab or in room K.06. Use the ILS Labs data server to move your data to other PCs, and to safely store it.
- Please contact Marijn Struiksma for a tutorial well before you are planning to run participants, and get some proficiency by observing/helping others run participants.
Important information
- NEVER let the electrodes touch metal. Always remove all of your jewellery before preparing the cap and cleaning the electrodes. Also, make sure your participant isn’t wearing any metal hairclips.
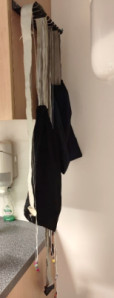
- When preparing the cap, let the bundles hang around your neck to prevent the ends from touching the floor.
- When cleaning the electrodes, make sure that the water is lukewarm. The gel will dissolve more easily when the water isn’t too cold, but too hot water will cause the electrodes to break faster.
- Never let the electrodes lay in the water for too long; when you put them into the water, clean and (gently) dry them immediately.
- NEVER let the other end of the bundle (which connects to the amplifier) touch water.
- NEVER let the electrodes sit under running water.
- Always clean the electrodes as soon as possible, before the gel gets the chance to dry.
- Be sure that no gel is left behind on the electrodes.
- Always clean the electrodes gently, using a soft brush. Don’t push or rub too hard.
Technical overview
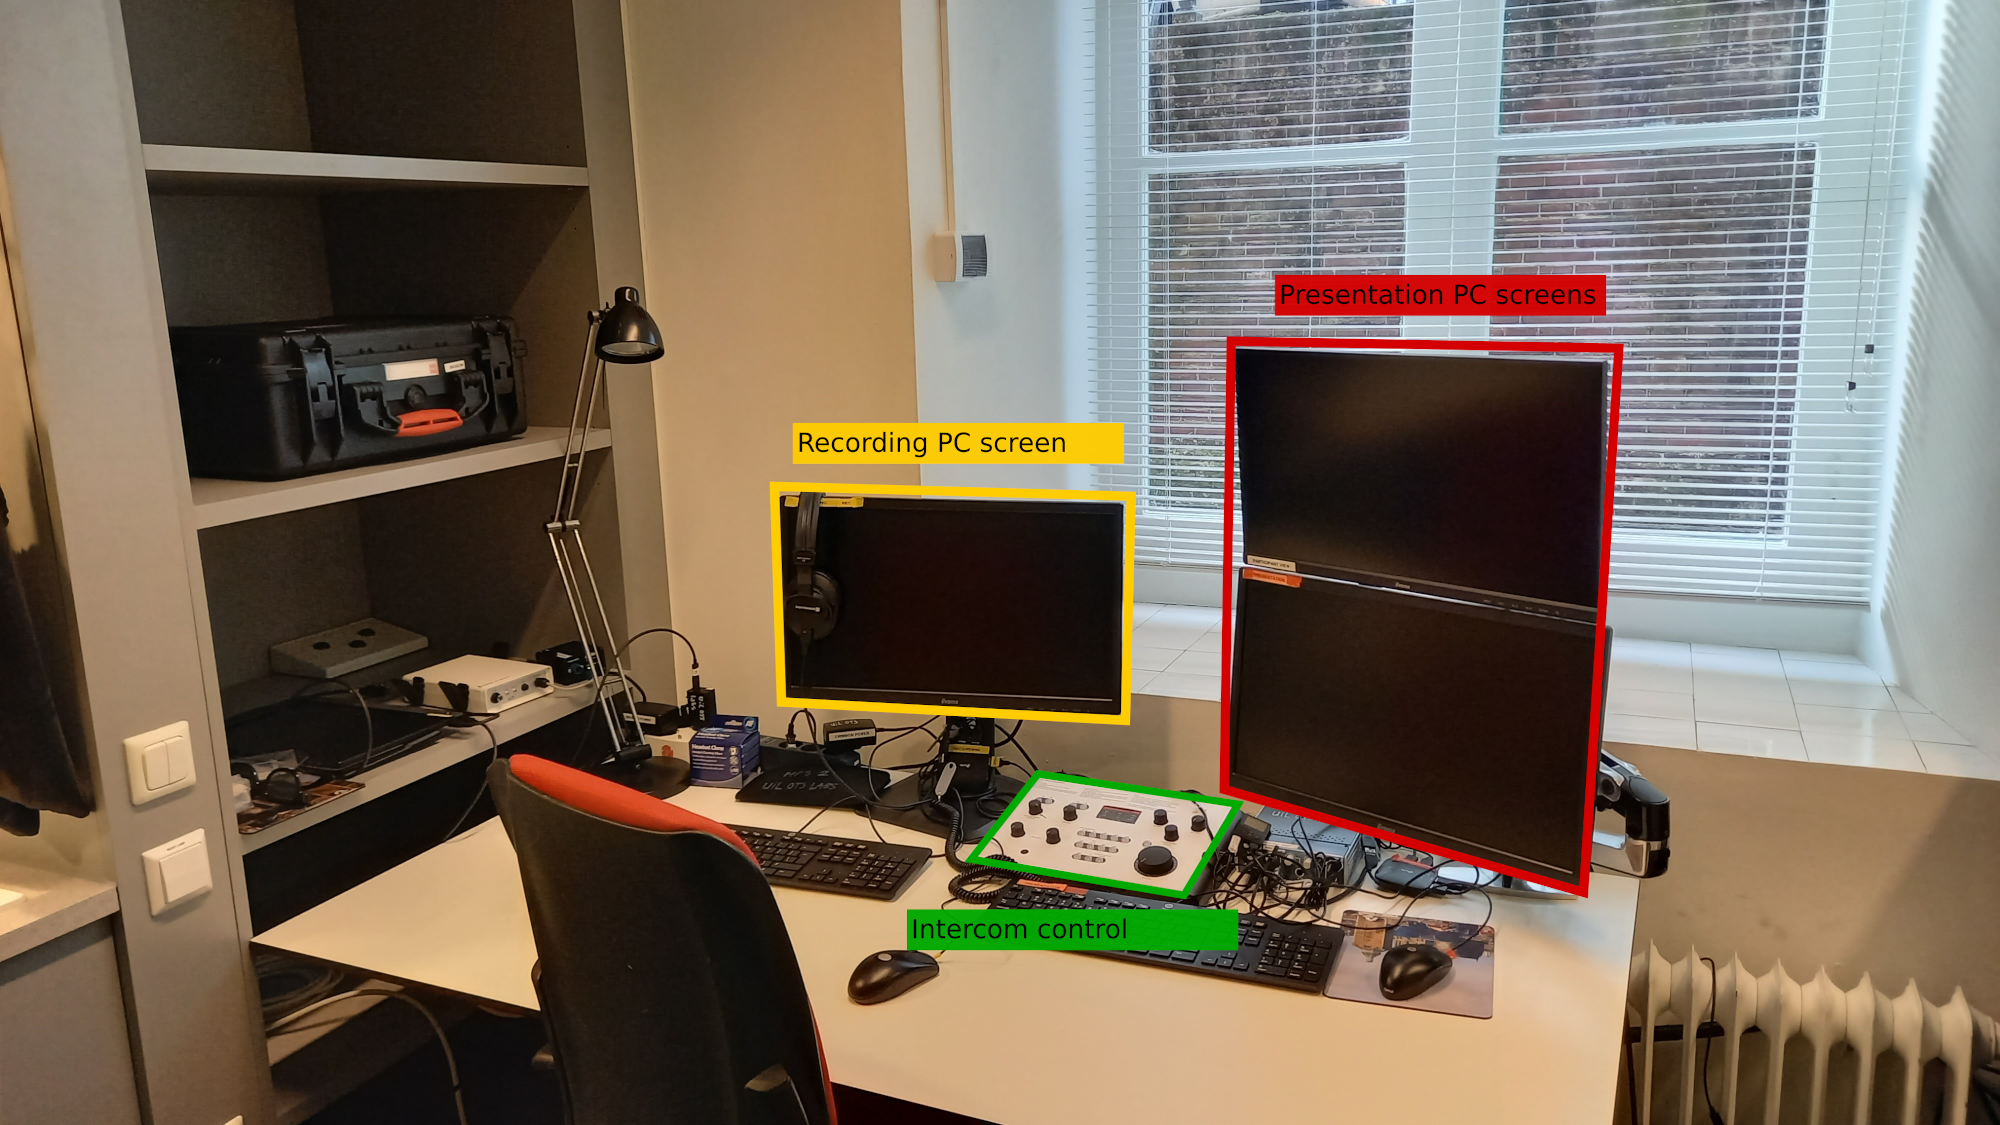
Experimenter’s workstation
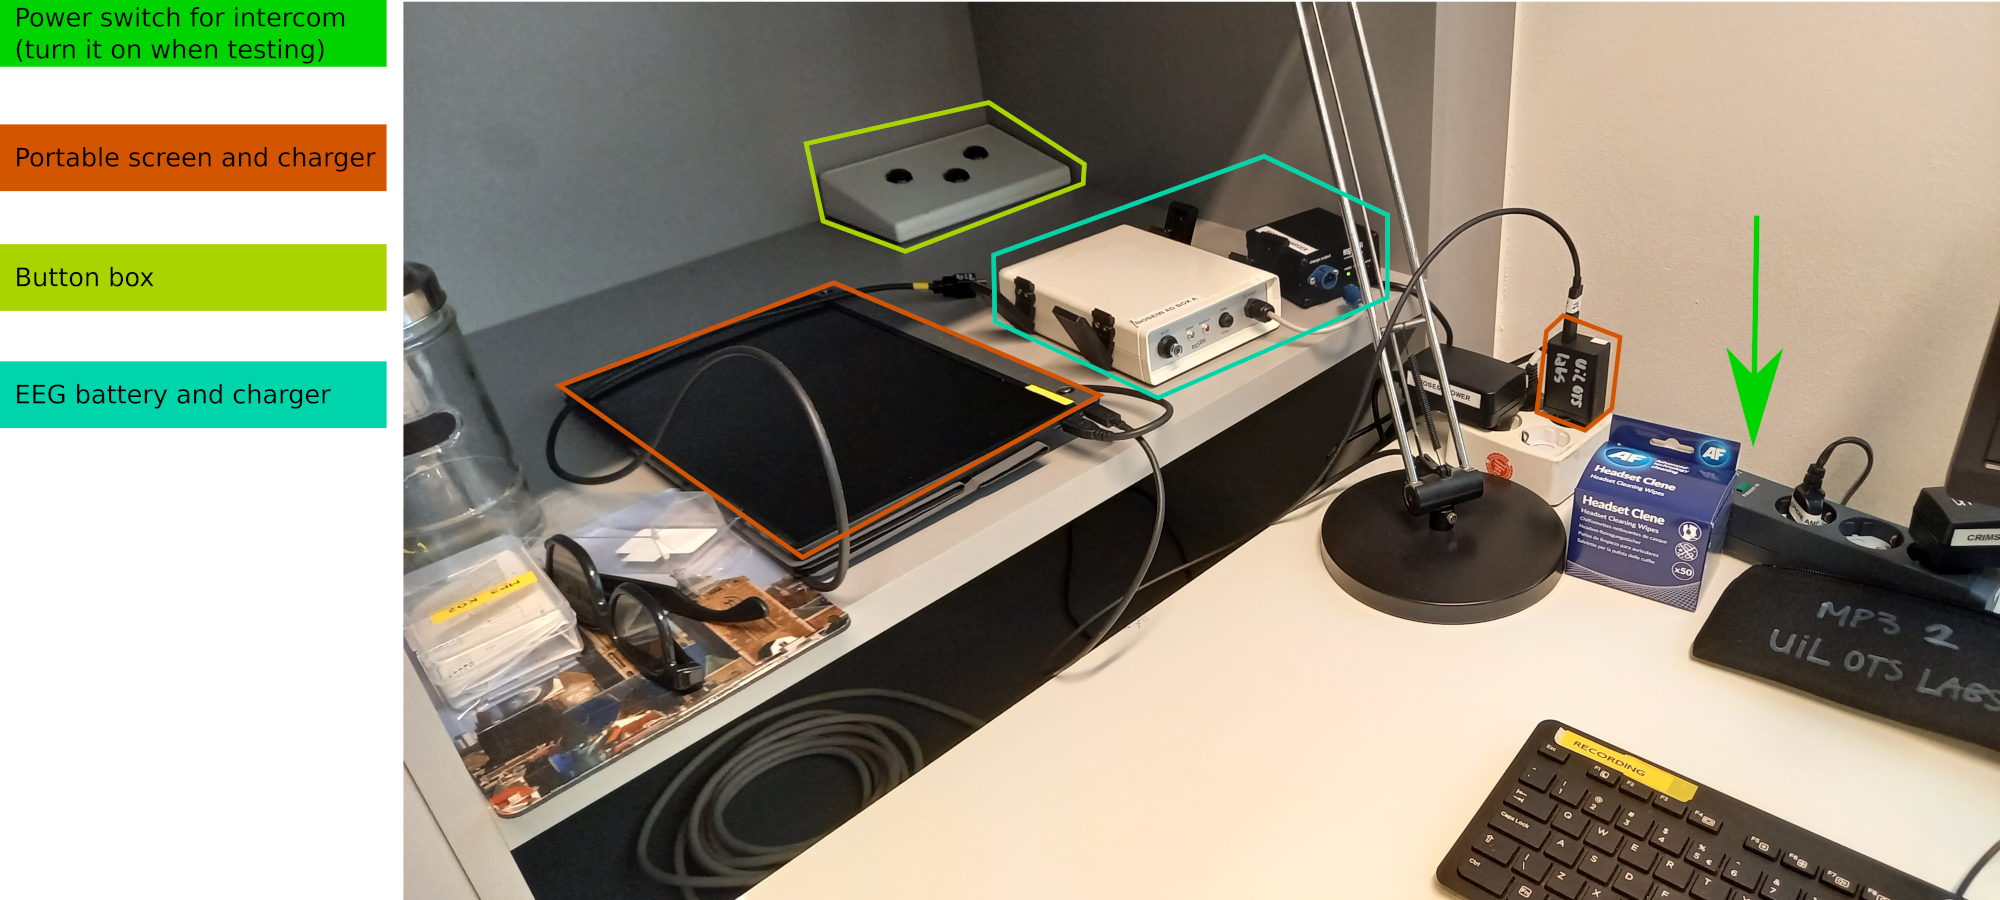
Booth
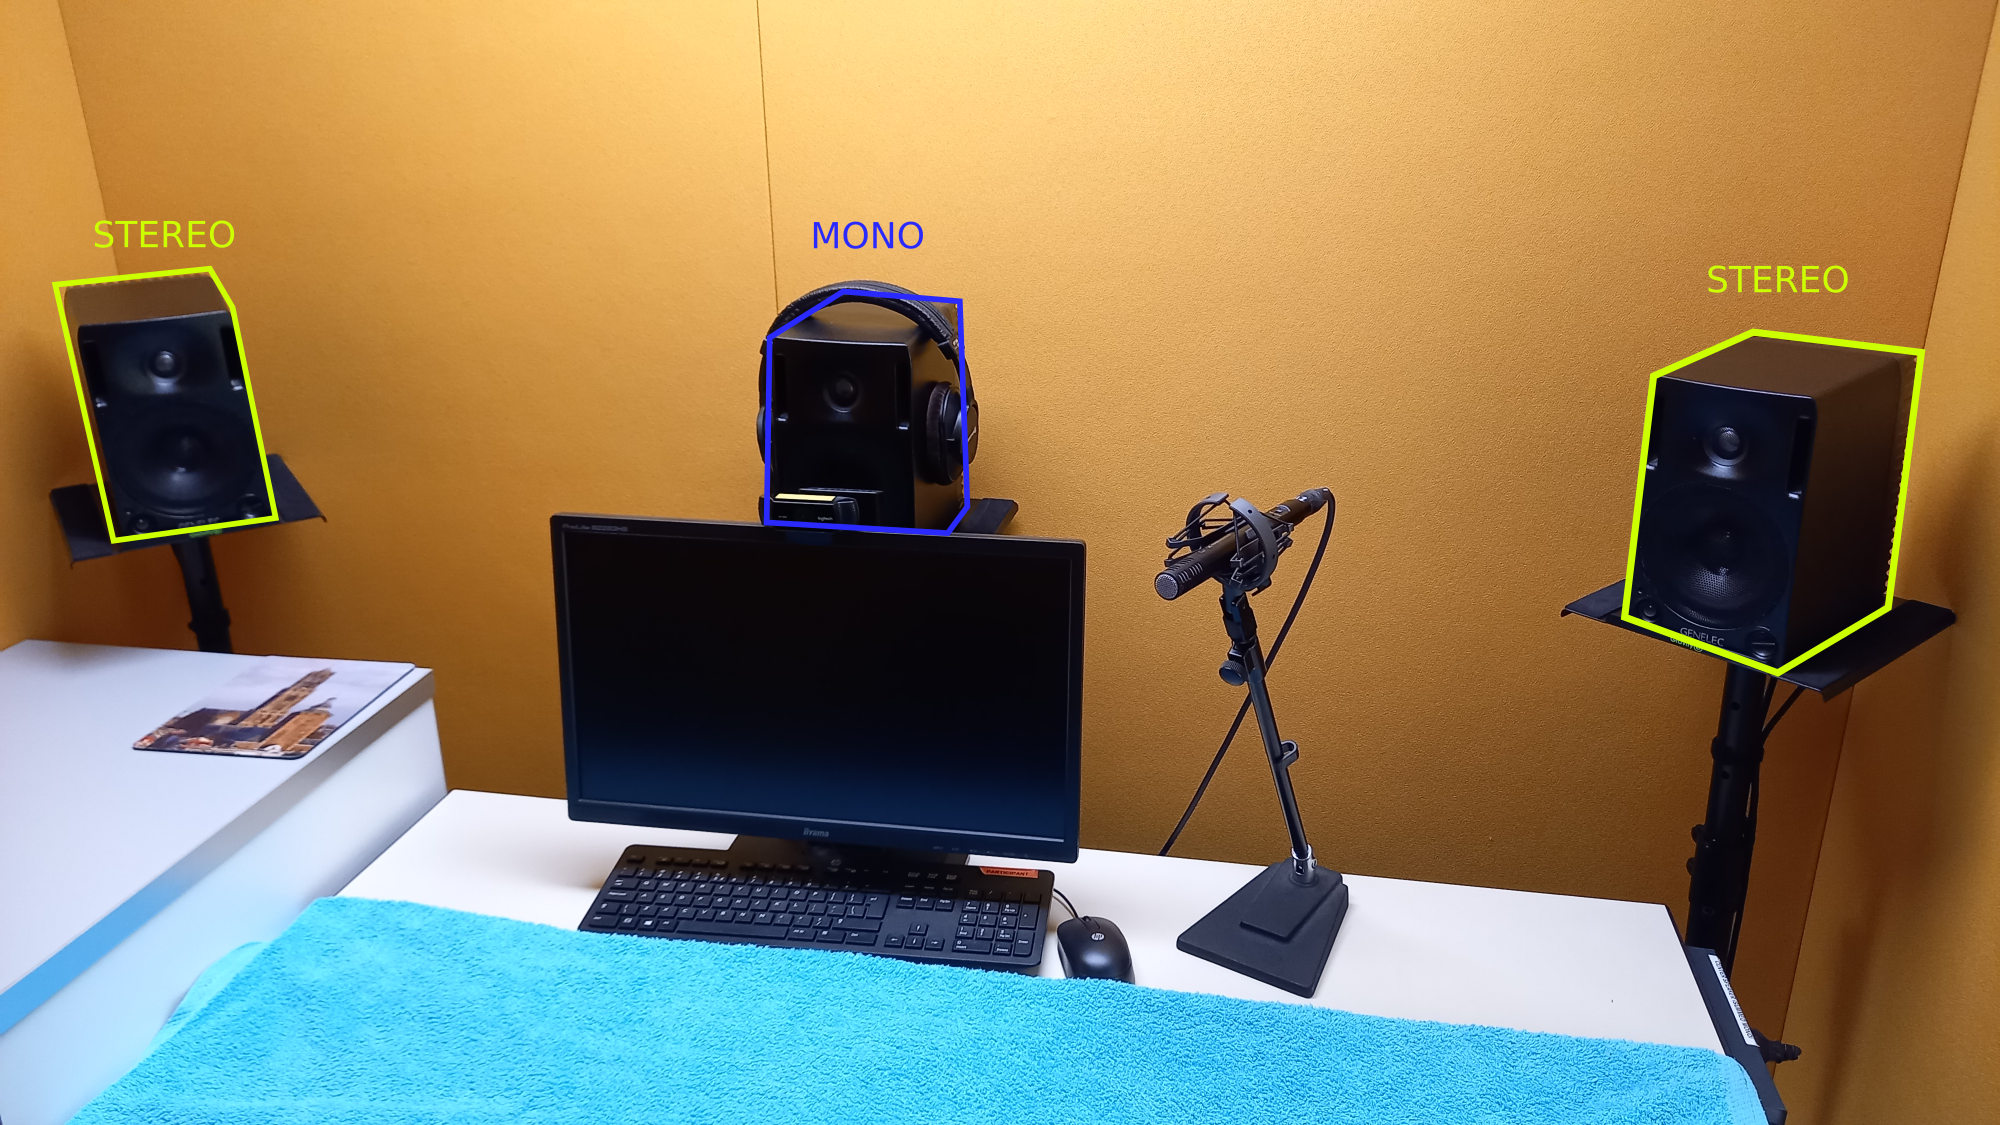
Audio can be played in either stereo or mono configurations.
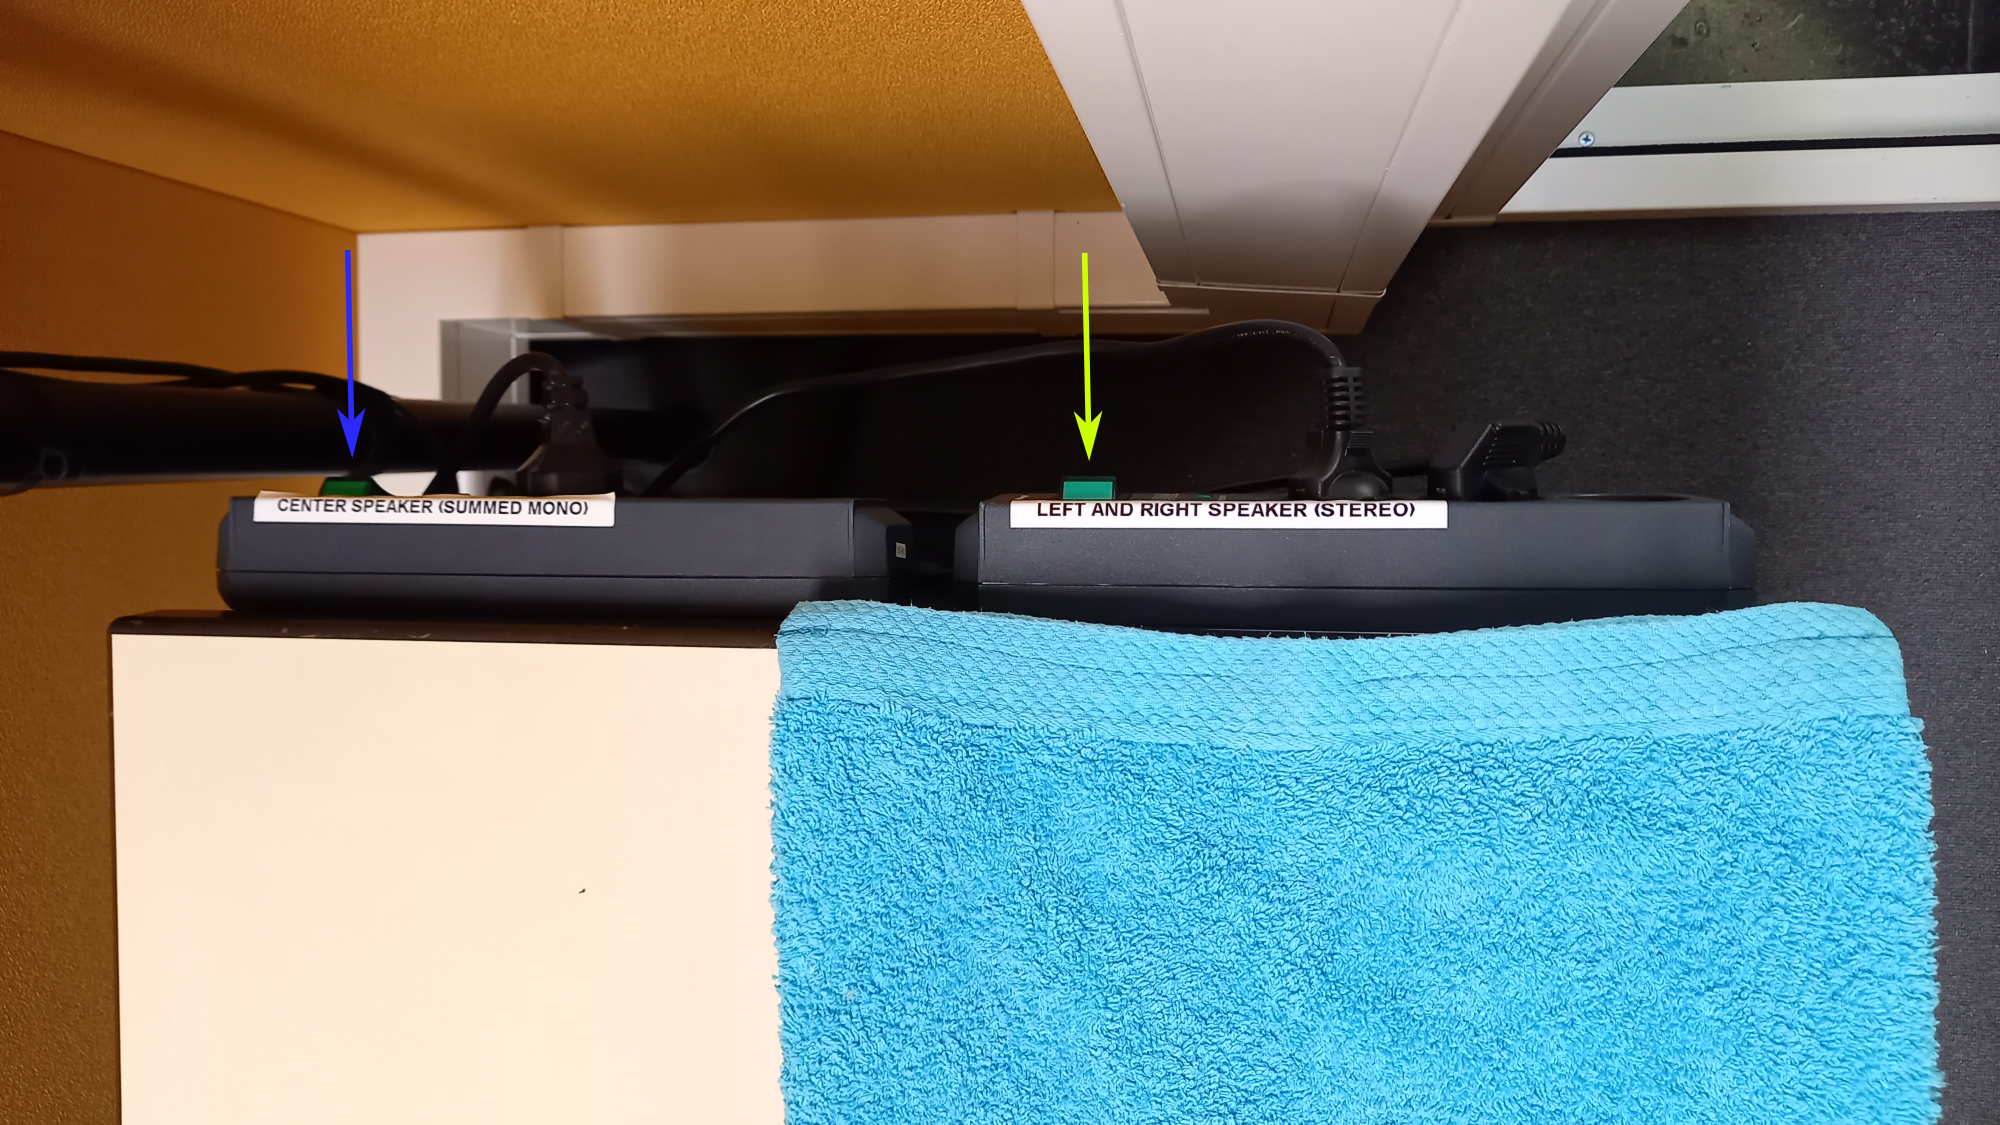
Choose the audio configuration for your experiment by turning on the relevant power strip.
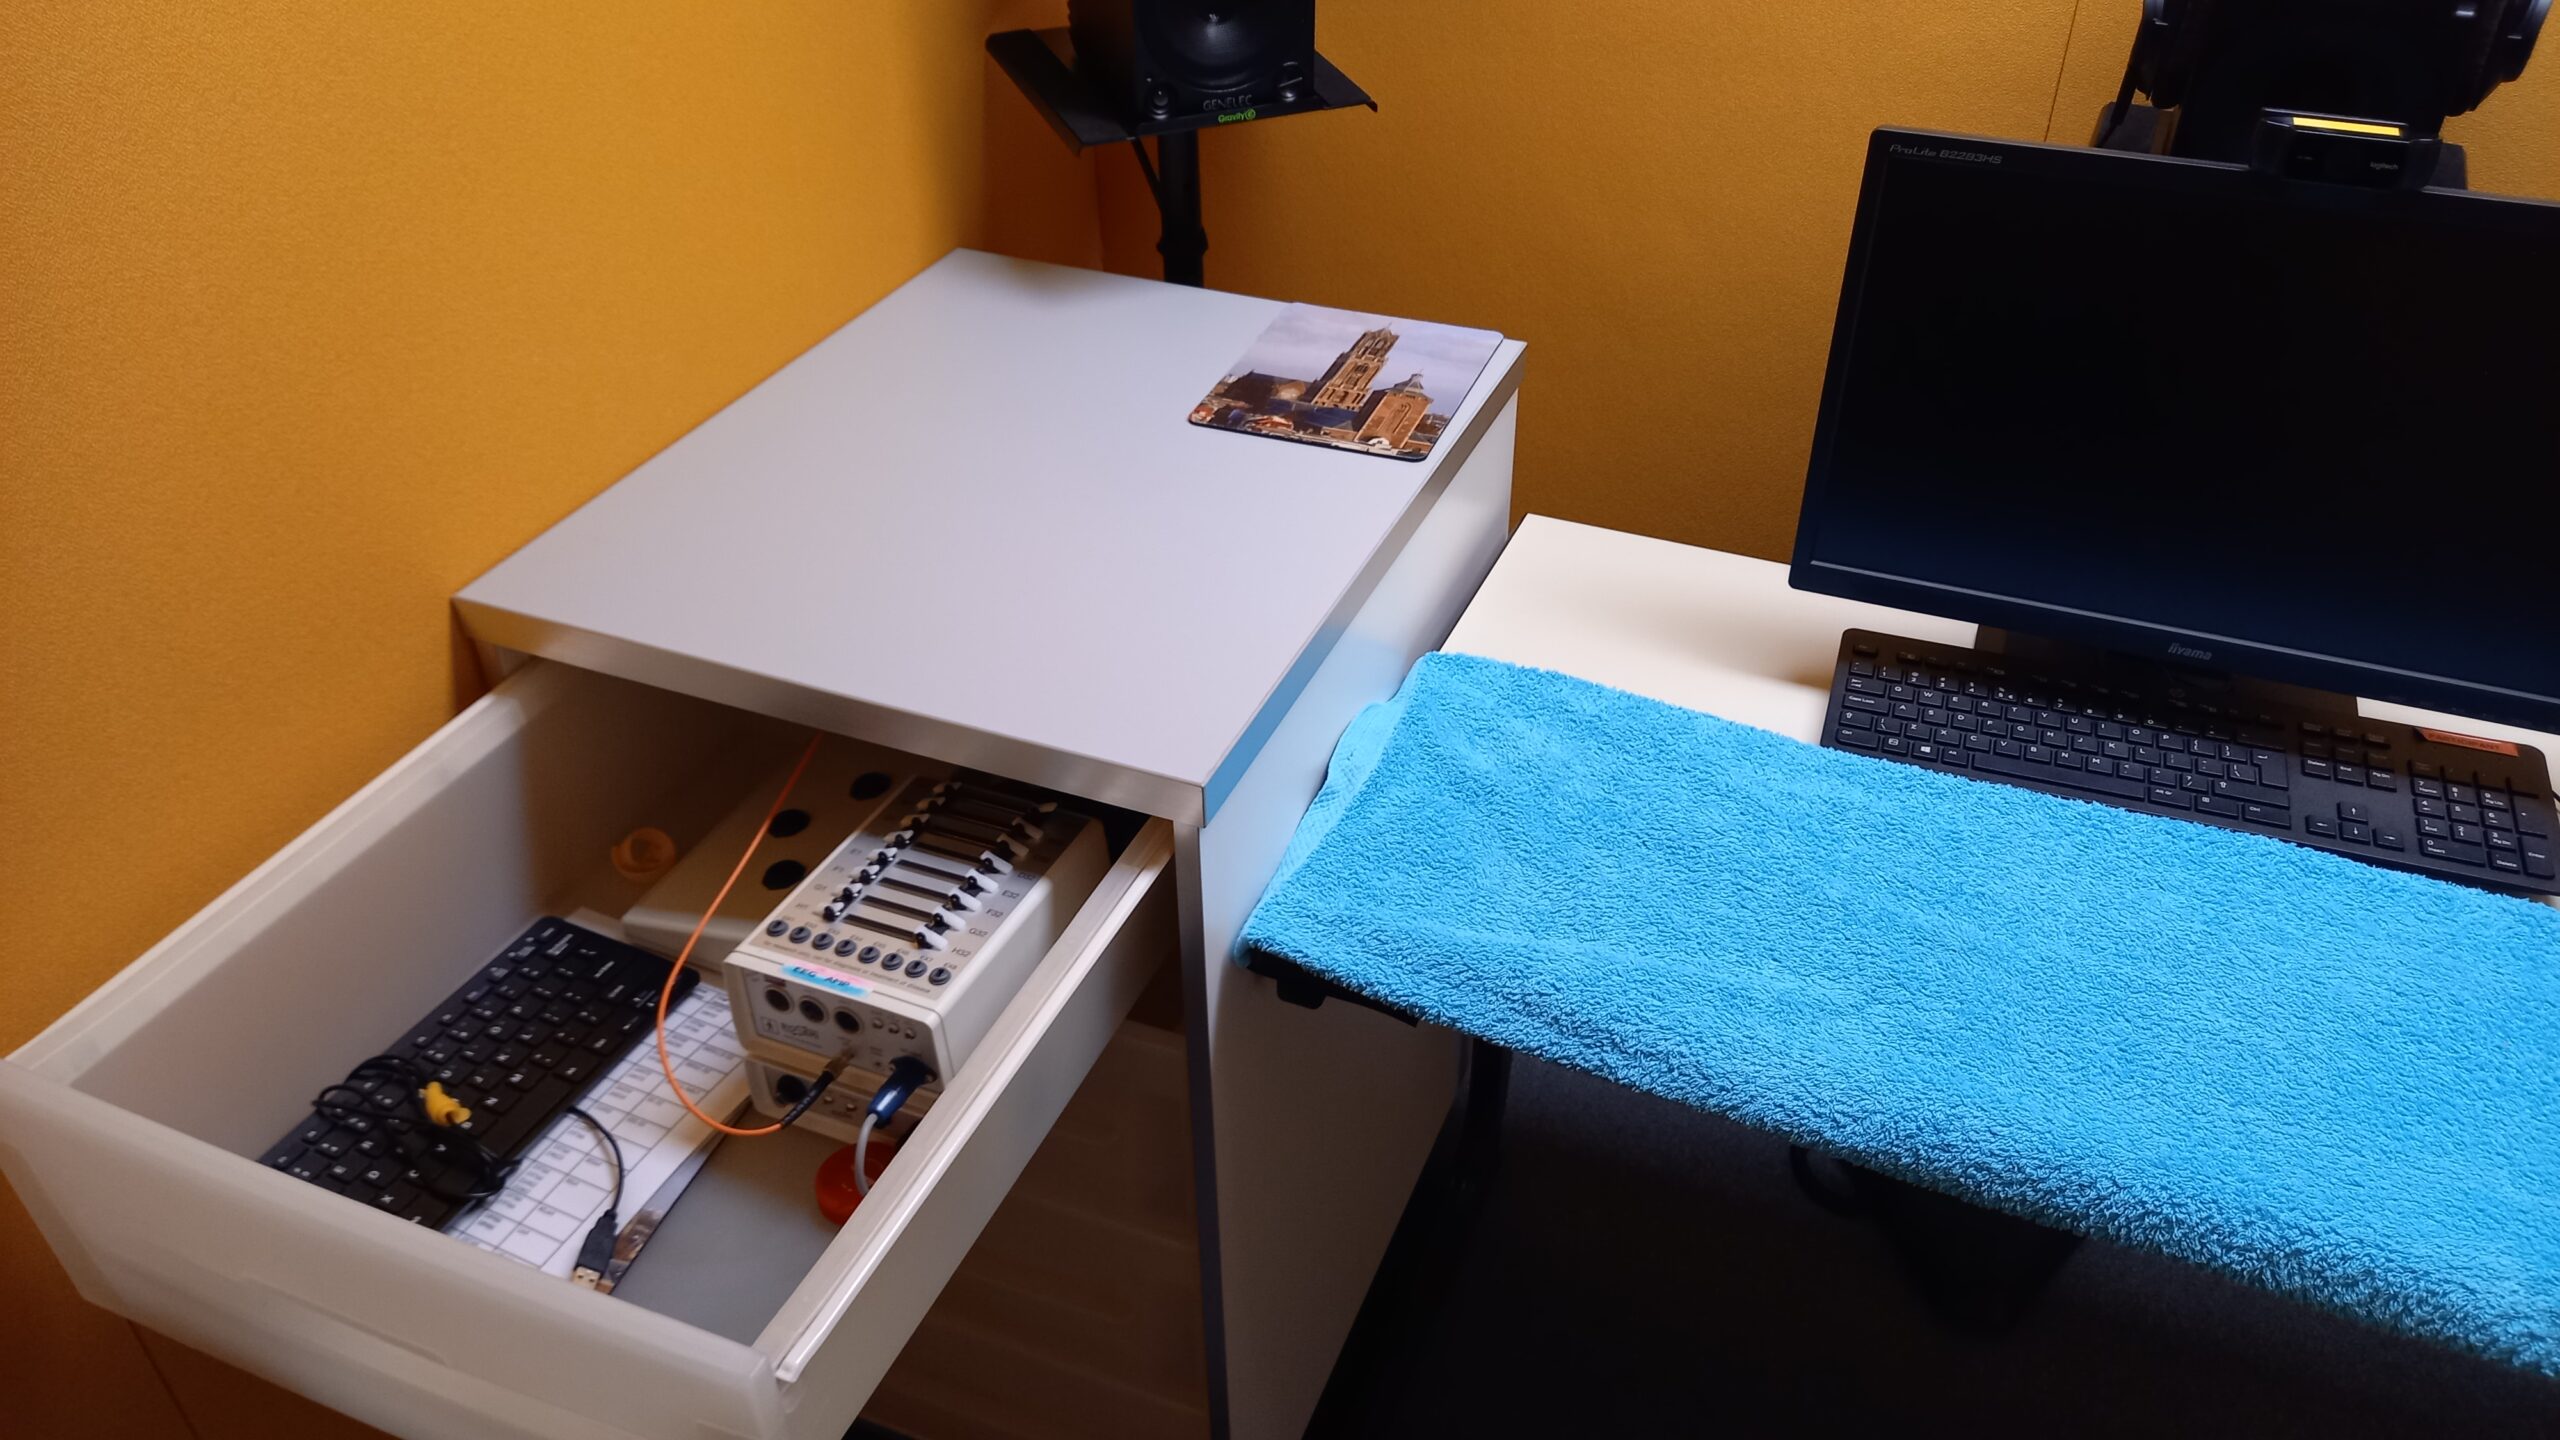
EEG amplifier, button box and extra keyboard are located in the first drawer.
Under the desk are two USB hubs for connecting to the recording or presentation computers. These can be used for external keyboards or button boxes.
HDMI port for connecting the portable monitor to recording PC – useful for checking electrodes in ActiView
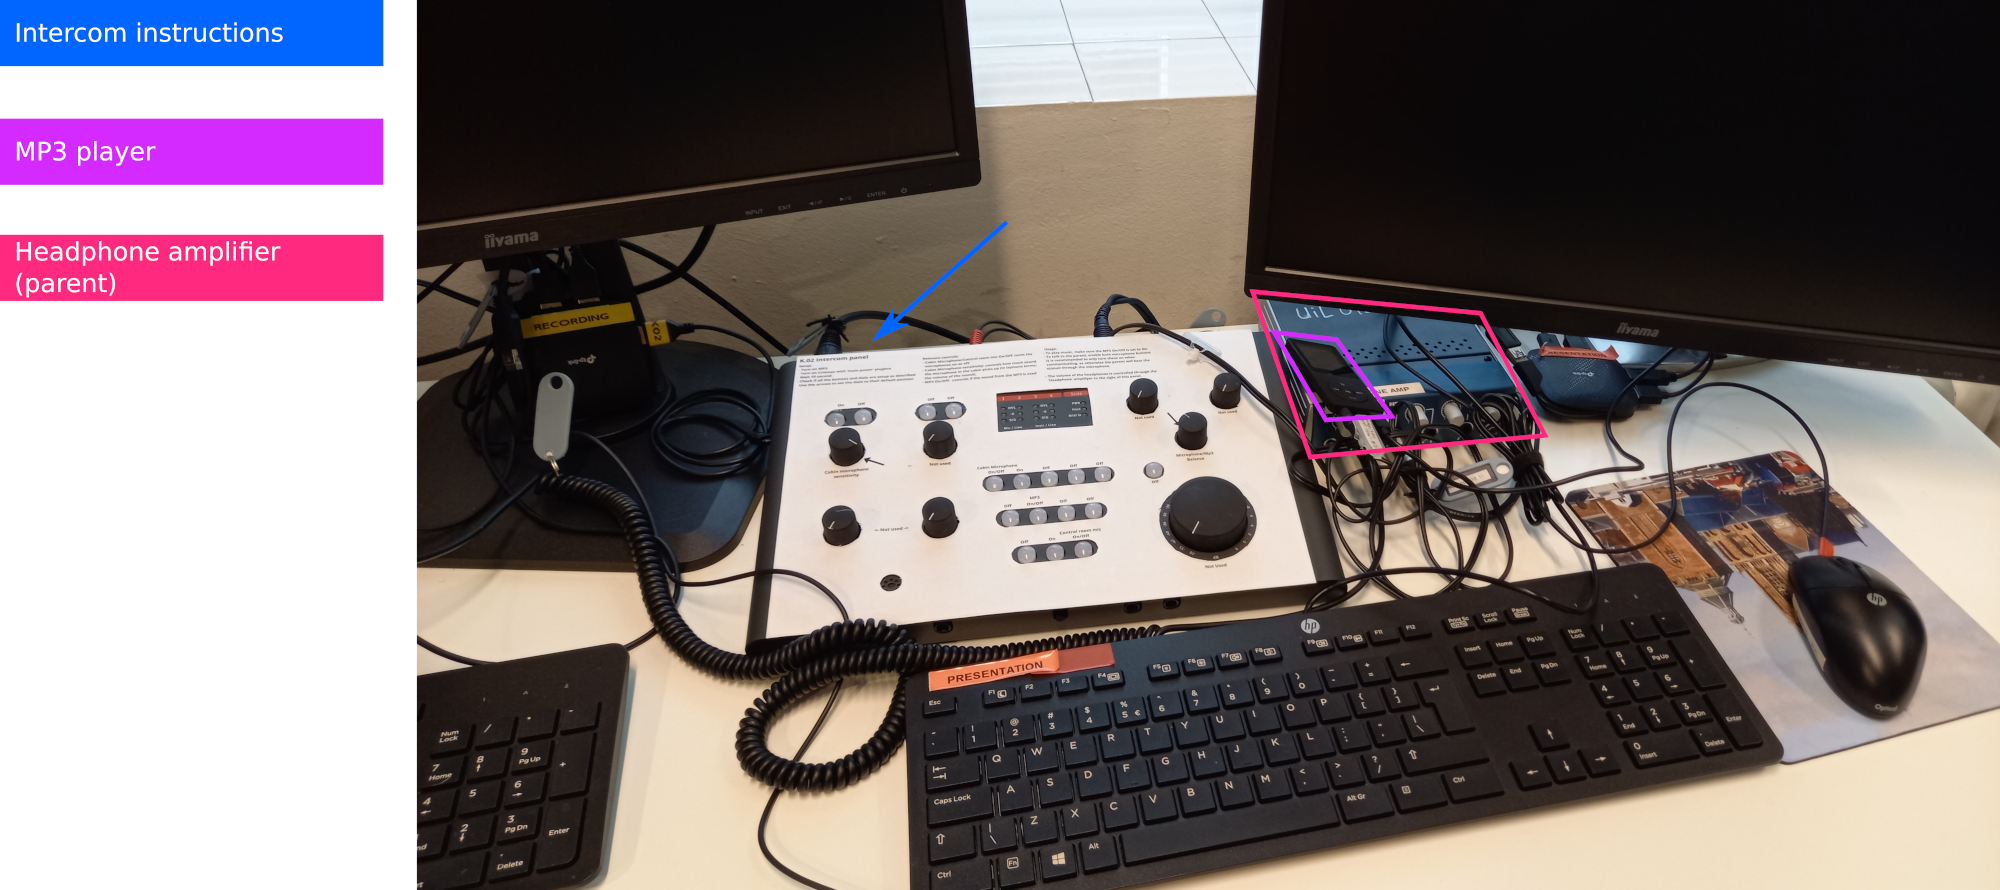
Experimenter’s workstation


Remember to turn on this power strip to enable the audio mixer.
Testing area

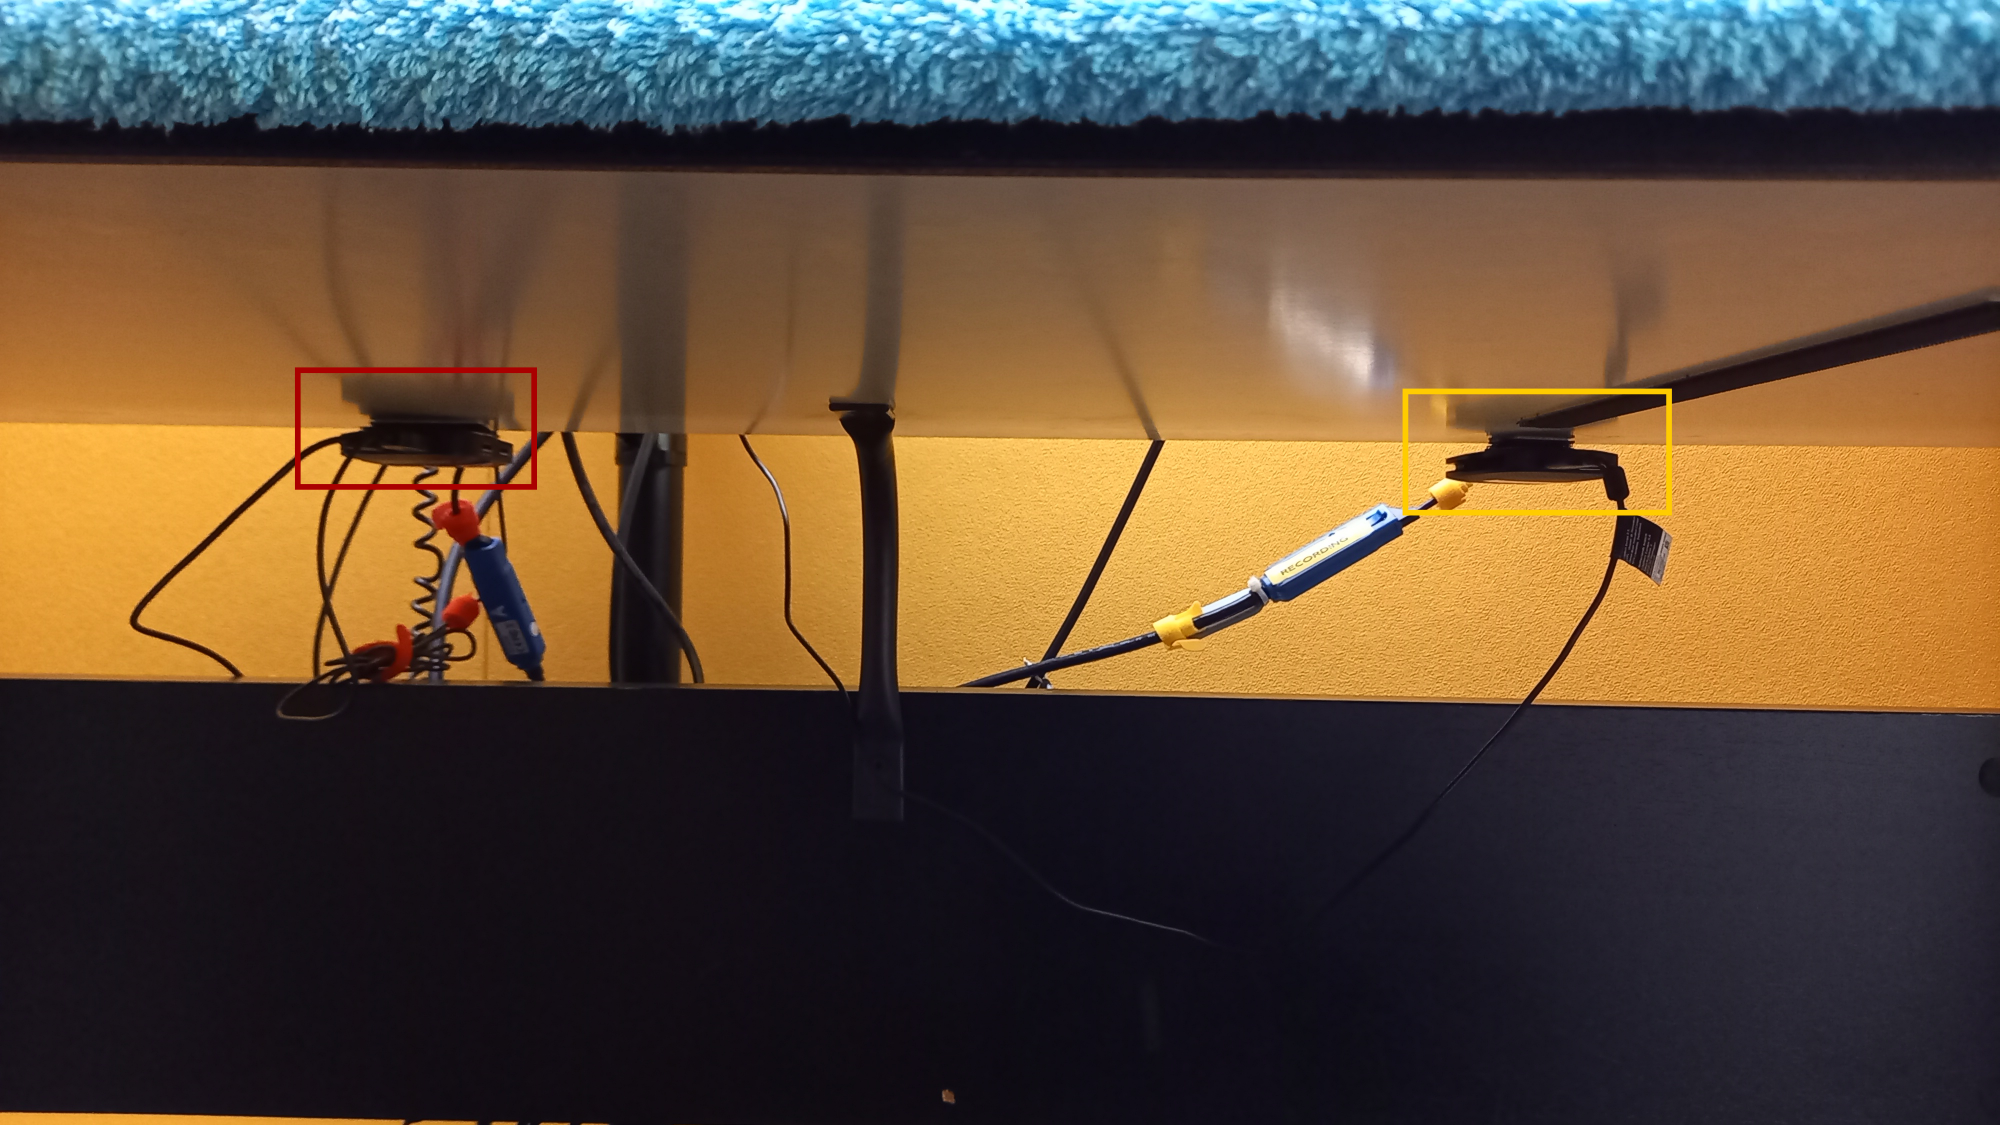
Not pictured is a USB hub under the table to which additional peripherals can be connected.
There are two “sides” to the system:
- An EEG amplifier (+ battery), located next to the participant and connected directly to the cap-mounted electrodes.
- A USB data receiver, connected to the amplifier with an optical fiber cable.
As an experimenter in the lab, you will work with the EEG amplifier.
We use two kinds of electrodes from BioSemi:
- “Pin-type” electrodes: these come in bundles and fit into the caps
- Flat electrodes: these are separate and are attached to the skin with special stickers
In each lab you should be able to find a range of caps in different sizes. Check the different sizes in the headcaps overview.
To record good EEG data it is important to select a cap that fits well. You will find more information under the “Running your experiment” section.
If your experiment requires active responses, it is recommended that you use a Beexy button box.
The Beexy box could be used directly with Zep to record accurate response times, or configured to emulate a normal computer keyboard.
Keyboard response device
To use the keyboard as a response device:
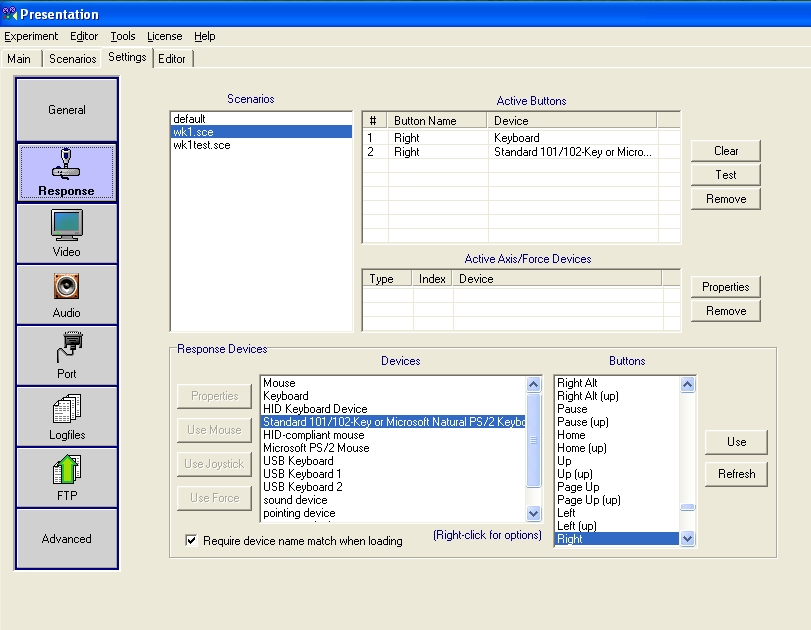 |
| Response Settings |
Example EEG script using the keyboard as the response device
Setting up your experiment
All research with human subjects has to be assessed by one of the two chambers of the Faculty Ethics Assessment Committee for the Humanities (FEtC-H). For more information click here.
For every experiment, it is necessary to have a detailed protocol. You can create one based on this how-to and the checklists for adults and/or for infants. Examples of a protocol are coming soon!
Every protocol needs to be checked by Marijn Struiksma.
Video Settings
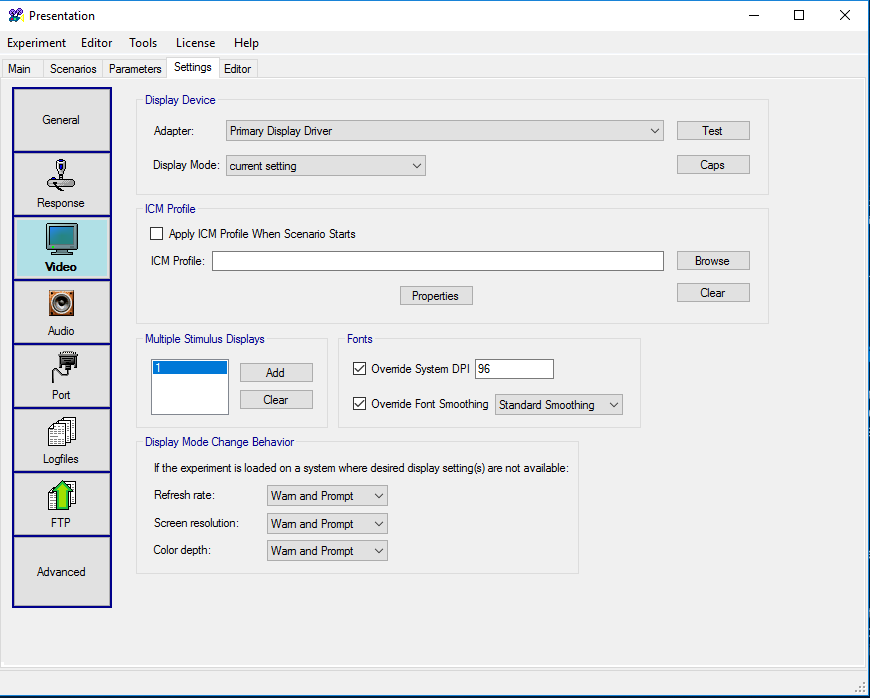
If the experiment does not start on the correct screen, try changing the chosen Adapter to another option.
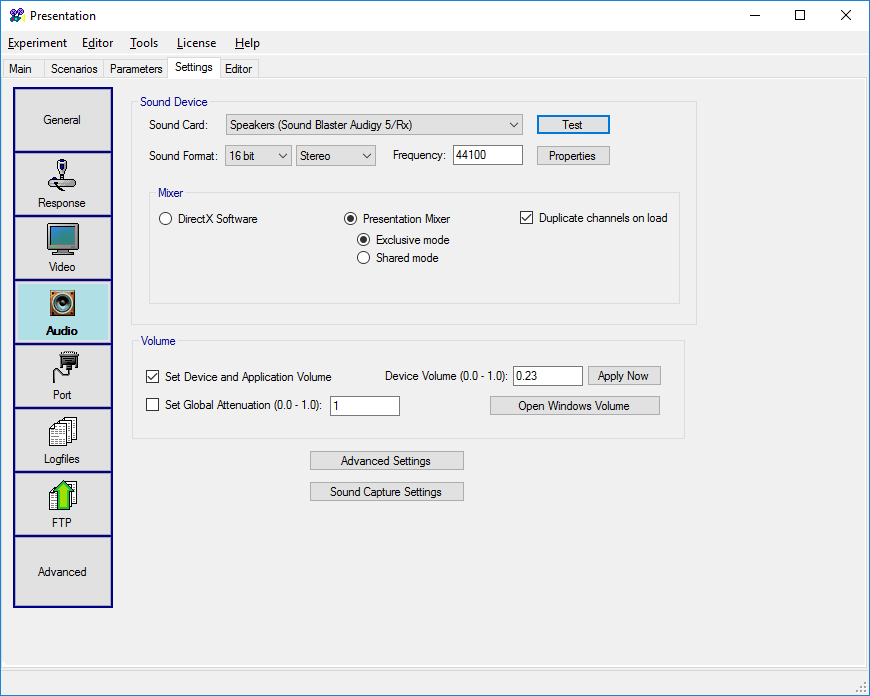
Audio Settings
Port Settings
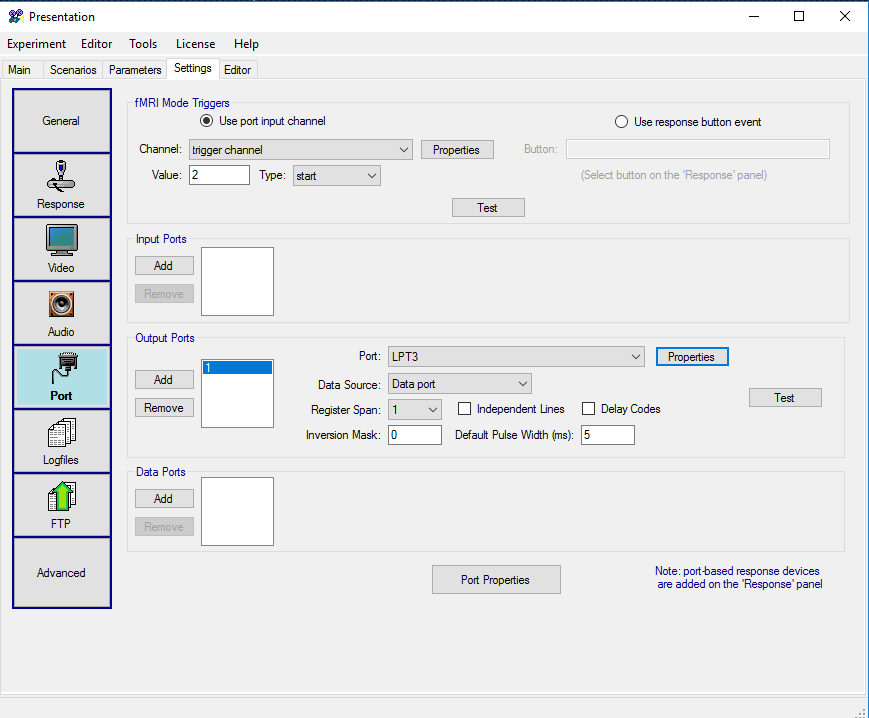
Using markers/triggers for EEG or ERP helps to identify specific events in your data. See this manual for an explanation of how to send triggers. If you want to use audio cue events as EEG markers or response targets, you can check this manual. When setting up the experiment, it is important to check whether the triggers are properly received.
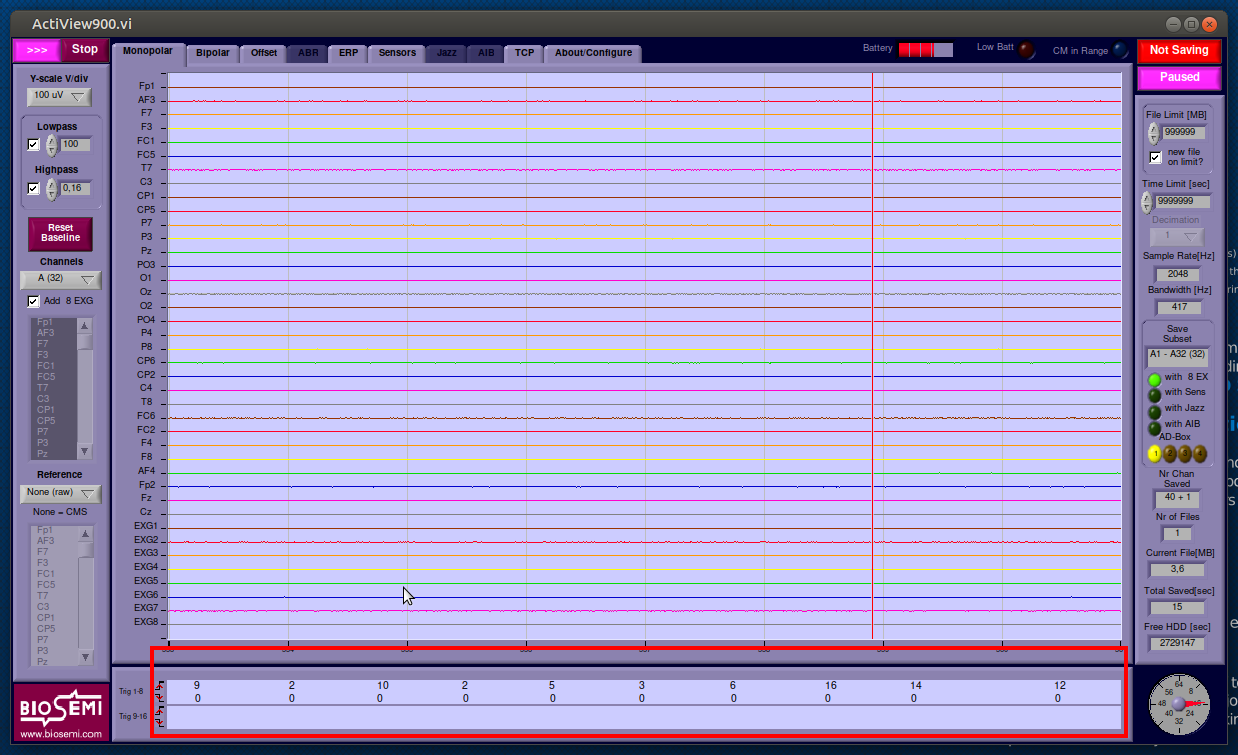
How to check for the triggers in ActiView:
- Make sure the recording computer is running Linux
- Make sure the EEG amplifier is switched on.
- Start ActiView from the start menu, or by pressing Alt+Space and typing ‘ActiView’ into the launcher, then enter.
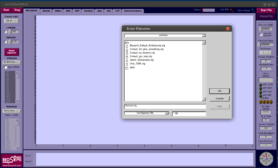
- A dialog should show up asking you to choose a configuration file. Choose the configuration file that matches your experimental setup:
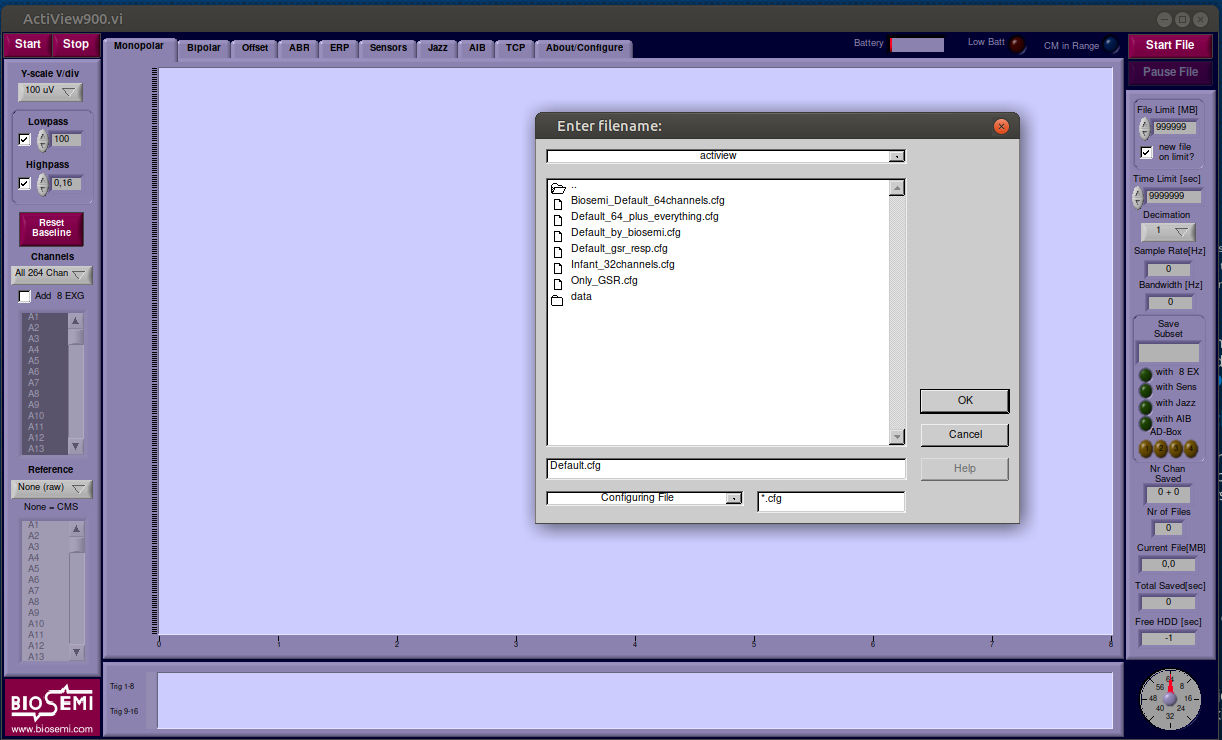
- Switch to the TCP tab and change trigger display from Analog to Decimal:

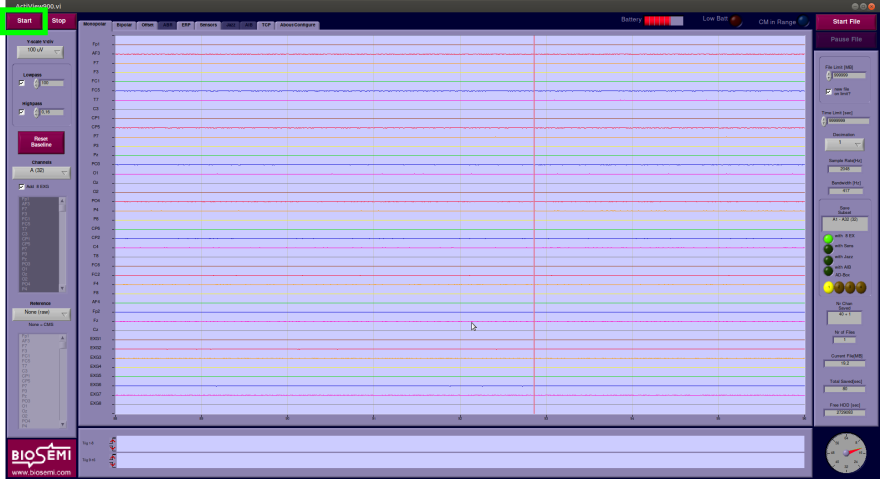
- Click Start in the top left corner to start the EEG data acquisition:

- Start your experiment and inspect the bottom panel for trigger codes:

Running an experiment
- Help with recruiting participants is available here.
- A template consent form can be retrieved from the FEtC-H website
Stock of supplies
For EEG and EMG research we have all kinds of supplies, such as gel, stickers, cotton wool etc. To make sure we do not unexpectedly run out of gel for example, it is important to collectively keep an inventory of supplies and let Marijn Struiksma and Desiree Capel know in time when supplies are running low.
Details on the supplies procedure can be found on this page.
Choosing a cap
Take out a cap in a size that fits the participants head circumference. There are several cap sizes available, that can be distinguished by colour (see “Technical overview”). To measure the head of the participant you can use the yellow measuring tape from one of the plastic cabinets (K.13) or from the kitchen cabinet (K.02).
After you’ve decided which cap to use, try to put on the cap in one go. Do it fast and try to avoid having to adjust the position of the cap too much, to prevent annoying the participant. Make sure that Cz is right on top of the head, in the exact middle between the ears and between the tip of the nose and the back of the head. The Fp-electrodes should be in the front; the O-electrodes should be at the back of the head. Take the ears through the little holes (only if it is possible) and fasten the cap with the Velcro.
Using the electrodes
Fill up the syringe with gel and put a little bit of gel into each electrode. Make sure the gel touches the scalp, so that a good connection can be made, but be gentle with the participant’s head.
Take one of the 32-electrode bundles (for babies) or 64-electrode bundles (adults; indicated with only a letter and no numbers at the beginning of the strap). Insert all electrodes into the corresponding holes in the cap, indicated by letters, numbers and colours. Start with the electrodes closest to the BioSemi amplifier, and end with the ones furthest away to avoid the electrodes from getting tangled. When looking at the electrode bundle, you will see that one side has a red edge. By beginning with this side, you will start with the electrodes on the left hand side (odd numbers). By beginning with the other side of the bundle, you will start with the electrodes on the right hand side of the cap (even numbers).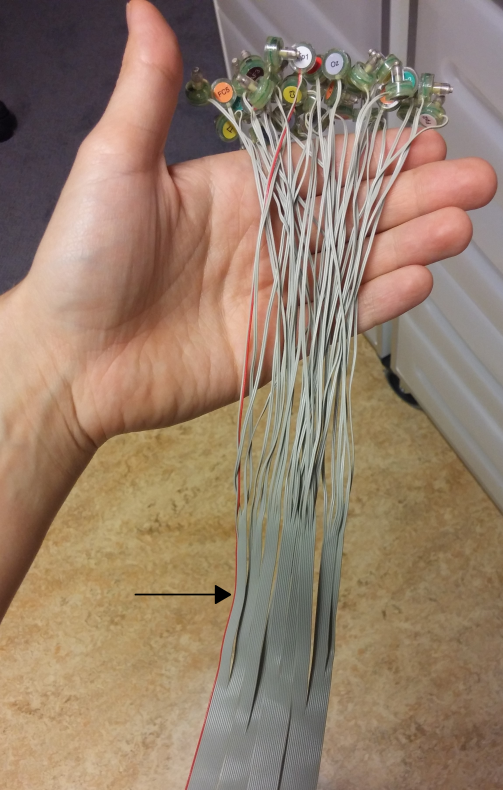
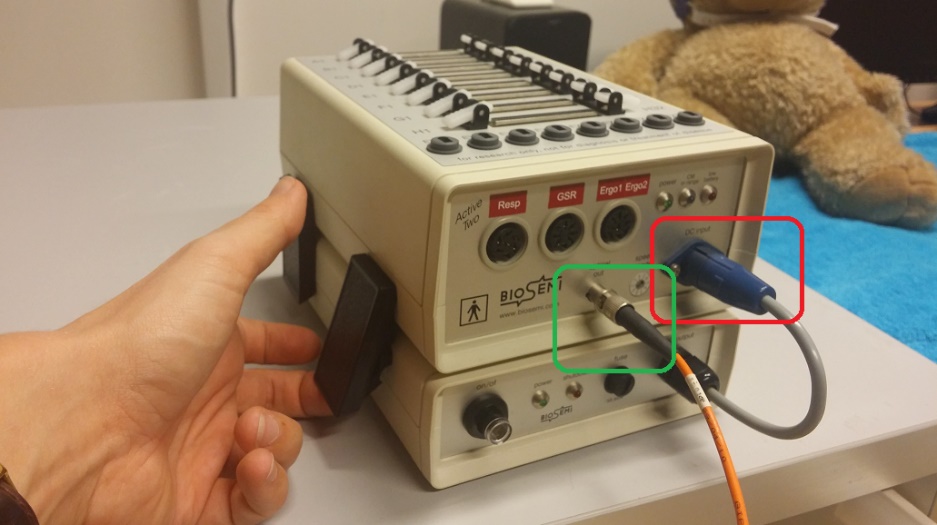
After you’ve inserted all electrodes into the cap, insert the other edge of the bundle into ‘A1’ on the BioSemi amplifier (circled in green). Press until the plastic white ‘wings’ on either side come up. Turn on the amplifier by pressing the button (circled in red). A blue light, as circled in yellow, should start to burn continuously. If the light flickers, this means that the electrodes CMS and DRL aren’t attached properly and may need more gel. Keep on adding more gel and pressing the cap to the head until the light stops flickering.
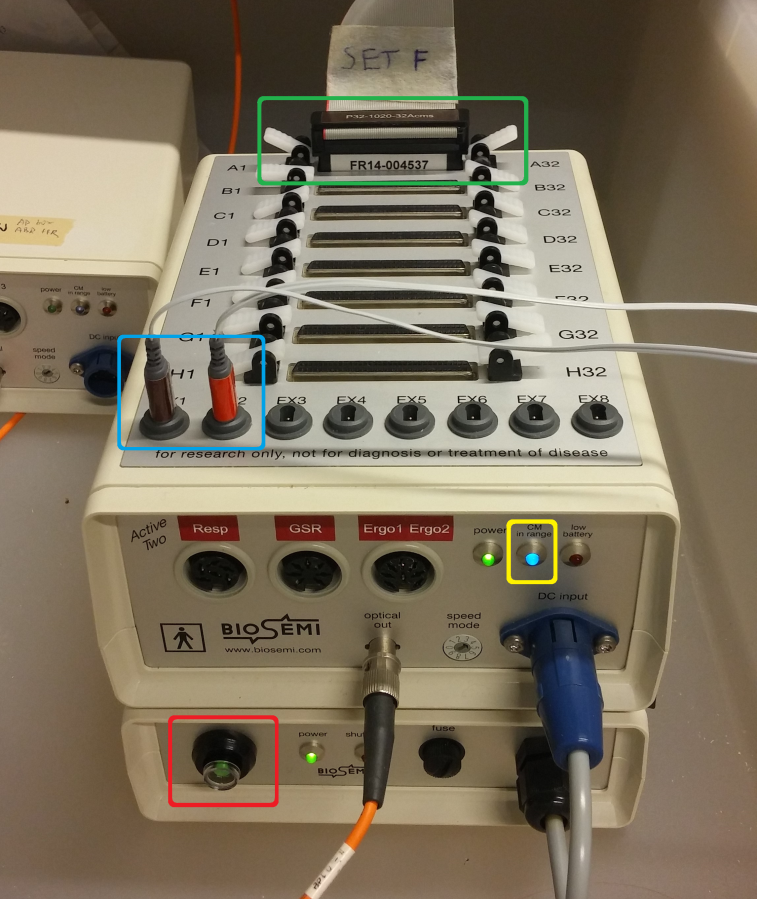
NOTE: Good signal from CMS and DRL is very important. If these two are not well connected, your signal will be messy and not usable!
Setting up
- Make sure the EEG amplifier is switched on.
- Make sure that the EEG acquisition computer is running Linux.
- Start ActiView from the start menu, or by pressing Alt+Space and typing ‘ActiView’ into the launcher, then enter.
- A dialog should show up asking you to choose a configuration file. Choose the configuration file that matches your experimental setup:
- Click Start in the top left corner to start the EEG data acquisition:
Checking the signal
- After all the electrodes are adjusted properly, it is time to check the signal. The first thing to check is the blue light on the BioSemi amplifier:
 If this light is blinking, it means the amplifier has shut all electrodes off, and it indicates a potential problem with the CMS and DRL electrodes. The CMS and DRL electrodes do not give you data, but form a reference to all other electrodes. Therefore, a problem with the CMS/DRL will influence everything. Try to adjust the CMS and DRL electrodes to get the blue light to stay on. If you can’t get it to work, it could be that the electrodes are faulty. In that case, you could try a different bundle (please inform the lab support about the faulty bundle).
Starting the recording
When you are ready to start recording the EEG signal, do as follows:
-
- Click the Start File button in the top-right corner of the screen:

-
- Proceed to select the correct set of electrodes you are using and press Ok. You will probably get an error message about the chosen file path, and then a chance to choose where to save your data.
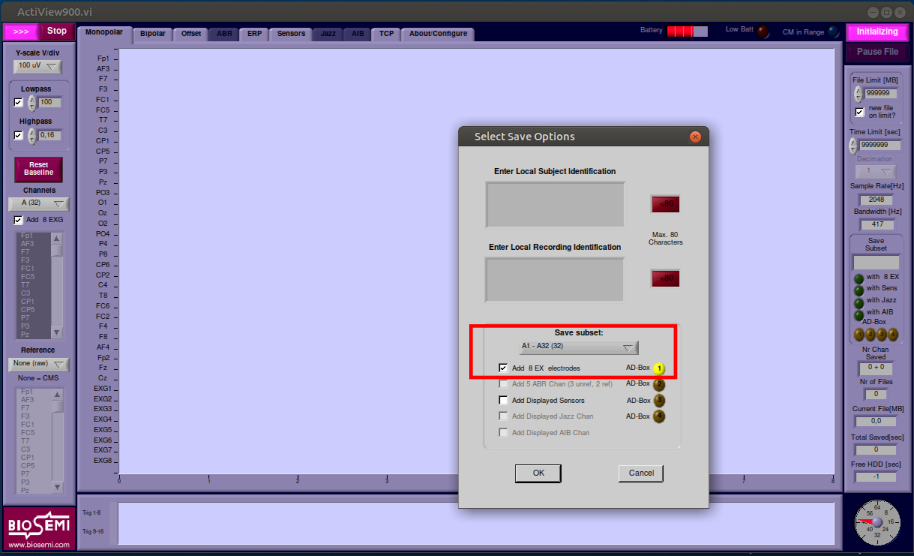
-
- At this point, the signals will be visible on the screen. But note that nothing is being saved as indicated by the red Not Saving button at the top right-corner.
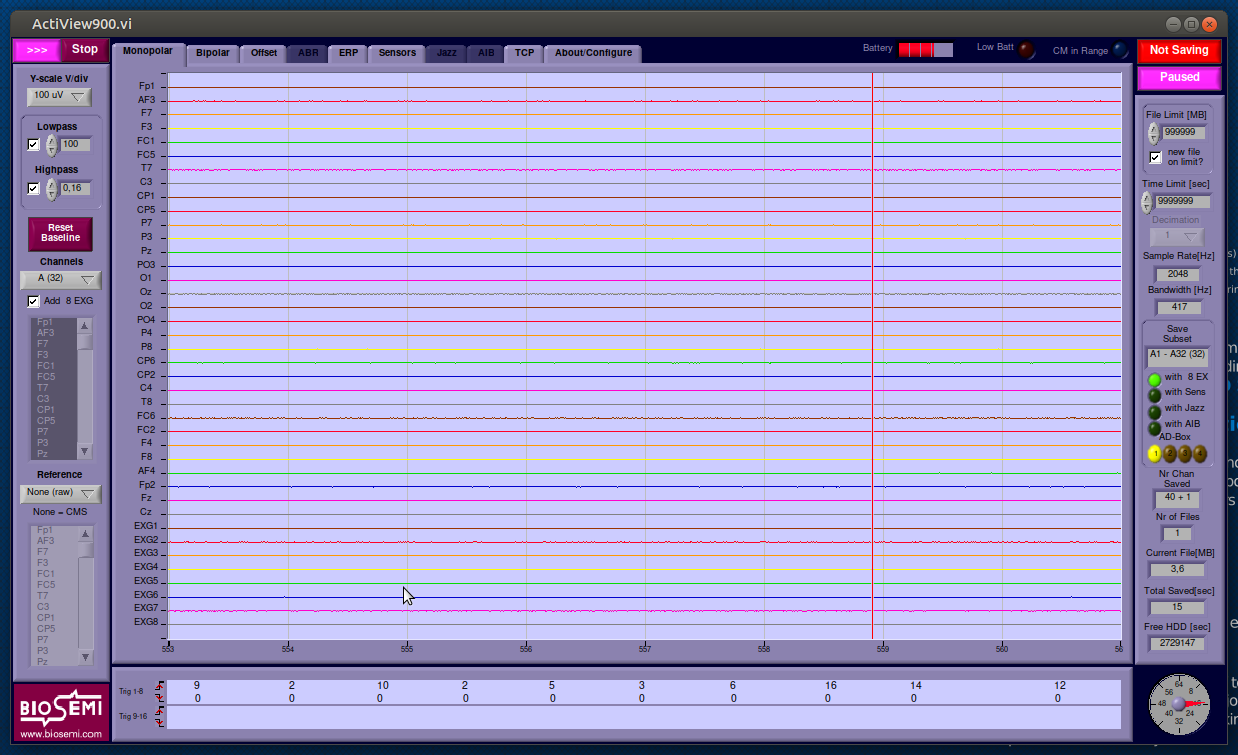
-
- To actually start the recording, press the pink Paused button and as a result Not Saving should be changed into Saving
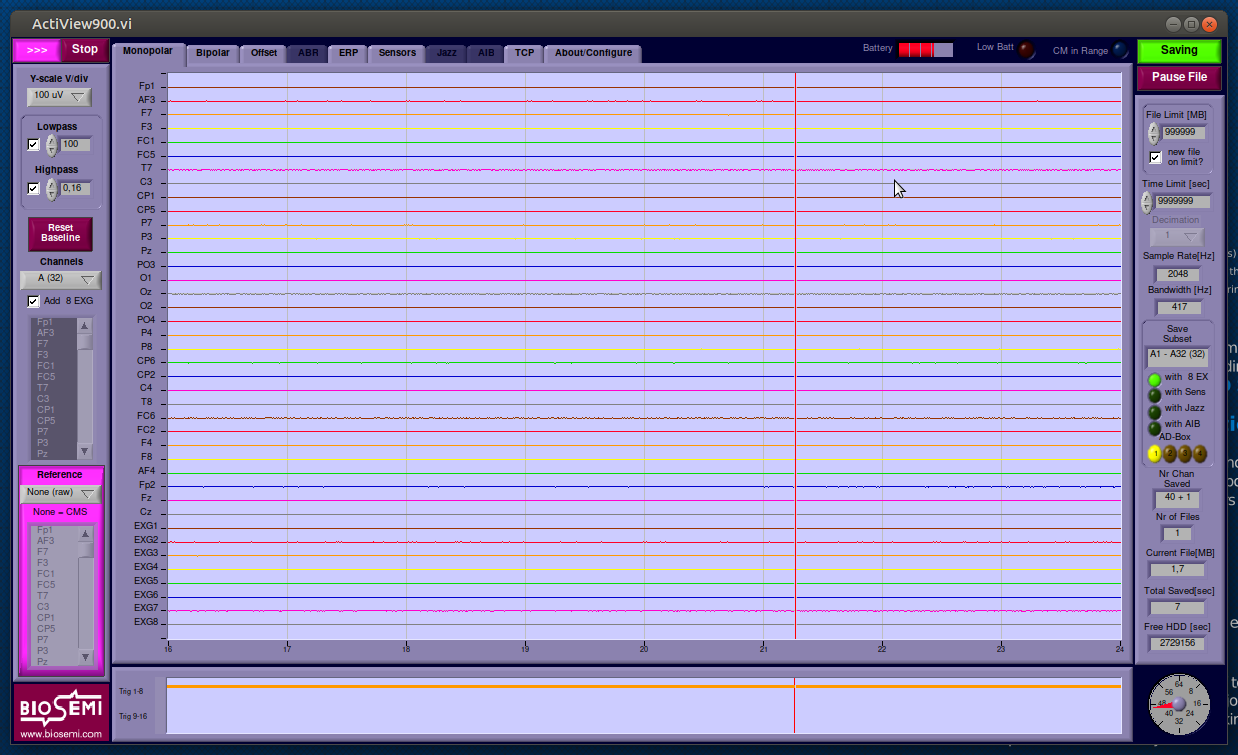
Pro tip: to be extra sure, open the folder where you chose to save the recording. You should see your BDF file created there. Press F5 a couple of times to refresh the folder view, and you should be able to see the file size growing.
Once you start OBS on the recording computer, it should be ready to go. Meaning, you should be able to see both the webcam and Actiview window on the recording screen.
Press the Start Recording button to start the recording. Press Stop Recording when you are done. The video file should appear in your home folder.
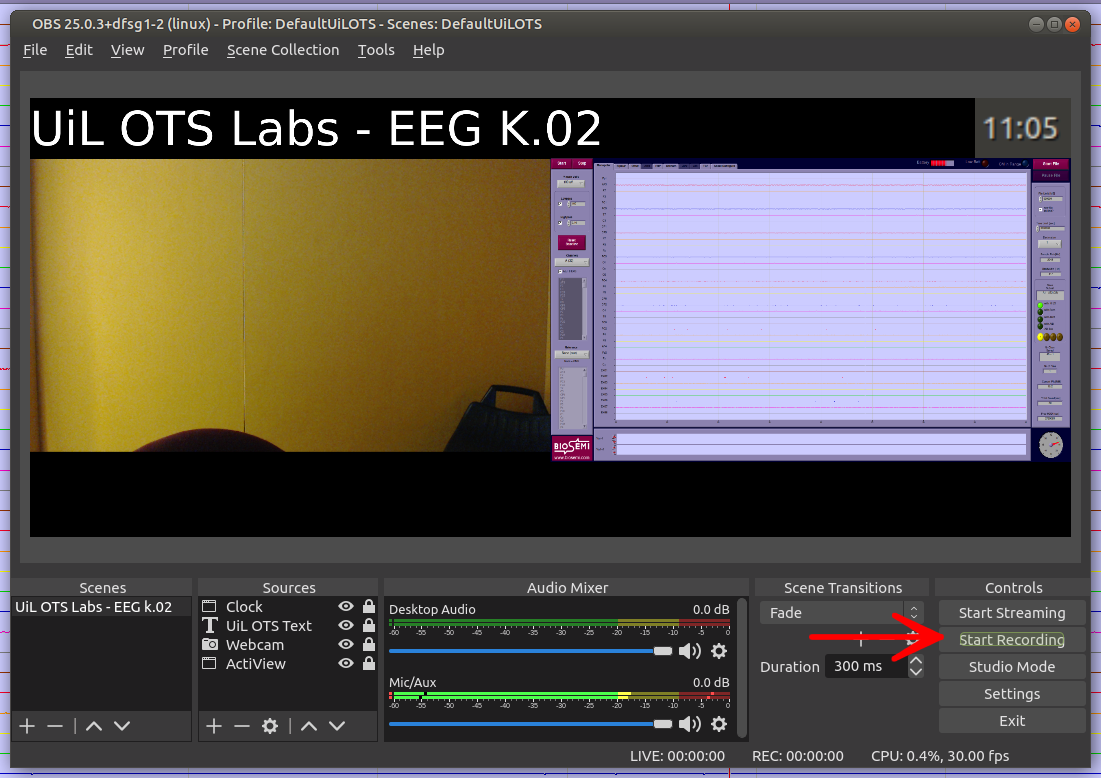
If you can’t find the start recording button in OBS, try to reset the UI by executing View -> Docks -> Reset UI from the main menu.
For more information about recording with OBS, see Recording videos with OBS studio.
Interacting with your participants
- Check that the participant read and understood the information letter.
- Let them sign the consent form.
- Switch off your mobile phone and make sure the participant does the same.
- Have the participant remove any jewelry (e.g. necklaces or earrings).
- Let the participant get rid of chewing gum, and send them to the toilet if they think they’ll need to use it in the next two hours or so.
- Write down the participant identification in your logbook.
How to test 4-months-olds
At 4 months, infants have just gained control over their heads and cannot sit down properly yet. Therefore, they have to sit on their parent’s lap during the experiment instead of in a high chair. A problem with this, however, is that infants tend to lean against their parent’s stomach, which may cause a lot of noise in the signal. Ask the parent explicitly to prevent this as much as possible. Because their motor skills haven’t quite developed yet, you won’t have to worry about them wanting to run away from the table. Instead, there’s a big chance that the child will cry during the experiment. If it does, try distracting the child, for instance with a bubble blower. If this doesn’t work, check with the parent whether it may need something. The child may be hungry or may need a diaper change, which are problems that can easily be solved after which you can continue the experiment. If the child is tired, however, it will be more difficult to continue the experiment and you may want to consider aborting it.
As far as the preparation of the cap is concerned, our experience is that the preparation before the appointment works best for 4-month-olds. Preparation directly on the infant’s head can take quite a long time, and 4-month-olds tend to get restless pretty quickly. Also, the signal of the pre-prepared cap is quite similar as to the one that’s prepared immediately onto the infant’s head. Preparing the cap before the appointment therefore saves a lot of time and frustration for the child. You can apply the mastoid electrodes first, and then put the prepared cap onto the head in one go. Make sure you immediately get the position right, as readjusting it may cause bridges between two electrodes.
Best cap size: blue/pink
How to test 12-months-olds
At 12 months, infants have gained a lot more motor skills already and some may have even started walking a little bit. This can be pretty cute, but the consequence of this is that they also want to move around and explore during your experiment, whereas you really want them to sit still. Make sure there is enough distraction for them as you put the cap onto their heads. You could for instance play Dora the Explorer on the screen, or have toys on the table for them to play with. If the infants aren’t allowed to play during the experiment, however, be careful when providing them with toys, as they may get upset when you take the toys away from them before the experiment starts. Instead, choose to play something fun on the screen.
For this age group, it also works best to prepare the cap in advance, to make sure they don’t have to sit still for a long time as you prepare the cap onto their heads. Be careful though with children who already have a lot of hair, as it may be more difficult to get a clean signal this way.
Best cap size: blue
How to test 20-months-olds
At 20 months, infants can already walk and they have started talking a little bit. You will notice that these children also have become much more aware of what is happening to them, and differences in character will be clearly visible. The word ‘no’ is especially well-known, and they won’t think twice about using it whenever they can. At this age, it is far more important to talk to them directly as opposed to the younger infants. Whereas you could still put the cap onto their heads without saying anything when they were just 12 months old, they now demand an explanation and a certain degree of autonomy from you. Below, you will find an overview of the tricks we used while testing 20-month-olds:
-
- Make the EEG caps look more child friendly, for instance by giving all the stuffed animals in the room an EEG cap as well.
- Decorate two caps of the correct size with child friendly figures, for instance flowers and stars, and let them choose which cap they want to put on their head. Make them believe they have a choice in the matter.
- As soon as the child walks into the room, point your attention directly to the child and explain to the child that all their stuffed animal friends wear beautiful caps, and they want to play a game with the child, but then the child gets to wear a cap too. Explain to them that they can choose which cap they want. Always be enthusiastic and point out all the nice things about wearing a cap.
- If the child is very shy or actively refuses to make a decision, take more time for this part and try to involve the parent. For instance, ask the parent if they also want to wear a cap, or put one on your own head as well to show the child it isn’t harmful. Another thing you can do is let the child choose if either you or the parent should put the cap onto the child’s head. Make sure you instruct the parent on how the cap should be placed.
- Once you have tricked the child into wearing the cap, first clean their skin behind the ears with alcohol before you proceed to put the cap onto their head. As soon as you have put the cap on, start a video with children’s songs to distract the child immediately. Our experience is that they will totally forget that they have something on their head as soon as they hear the songs.
- While the infant is listening to the children’s songs, you can put a little bit of gel onto the child’s wrist, explain to the parent what you are going to do and afterwards check the child’s wrist again for any allergic reactions. If there aren’t any, you can start the preparation of the cap by inserting the gel into the holes.
Note that preparing the cap before the appointment does not work for this age group, as their scalp has become thicker and they have gained a lot more hair. Therefore, more distraction is needed to keep them from getting upset while undergoing the preparation.
Best cap size: green/blue for girls, green for boys
After the experiment
Everyone testing in K0.02 and K0.13 is responsible for the supply of towels. If you test participants then you are also responsible for the towels to be washed. This means that also after you have tested your final participant you bring the dirty towels to get washed and pick them up as well. If experiments are running in both labs, coordinate with the other researcher(s) who will bring the laundry and pick it up.
Detailed instructions on towel handling and laundry can be found on this page.
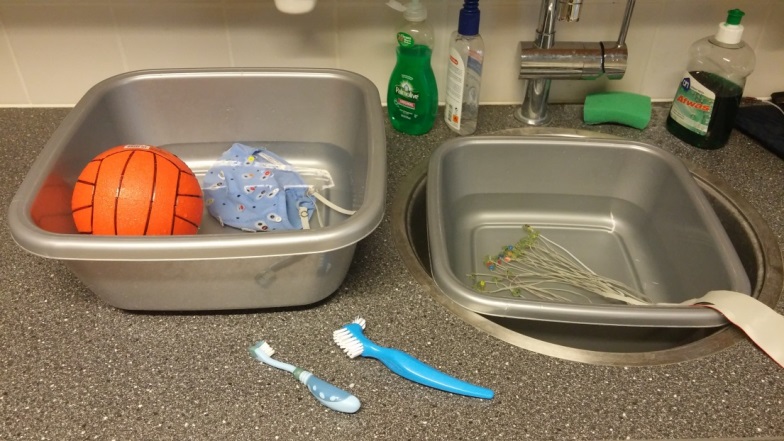
Remove the electrodes from the cap and gently place them into the water.
The use of soap is highly discouraged! No soap!
Ensure that only the electrodes are wet and the connector side remains dry.
Do not let the electrodes sit under running water! Use the softest toothbrush to gently clean the electrodes. Pat dry them with a piece of paper towel. Hang the bundle back to its place and put the end with the electrodes back in the bag to prevent them getting (sun)light.
Place the cap in the other washtub. Wash the cap with Ivory or Palmolive soap. Let it soak in lukewarm (not hot!!) water for a while first: this will get rid of most of the gel already. Use the tiny brush to go through each of the holes, and make sure you keep track of what row you’re cleaning. Cleaning it color by color can prevent you from losing track. After cleaning one hole, clean the little brush in the water so that the left-over gel doesn’t get put into the next hole. Scrub the fabric of the cap gently, and rinse the entire cap under the tap so that the remaining soap is gone. Also rinse the chin strap carefully. Hang the cap out to dry on one of the hooks above the sink.
Fill the syringe a few times with lukewarm water and press it empty to remove the gel in the tip. To prevent clogging, also clean the syringe with a brush.
If any of the supplies are running short notify the labmanagers. Always remember to fill in the supply form (see: EEG supplies).
Return the lab key to where you got it from (e.g. the key safe).
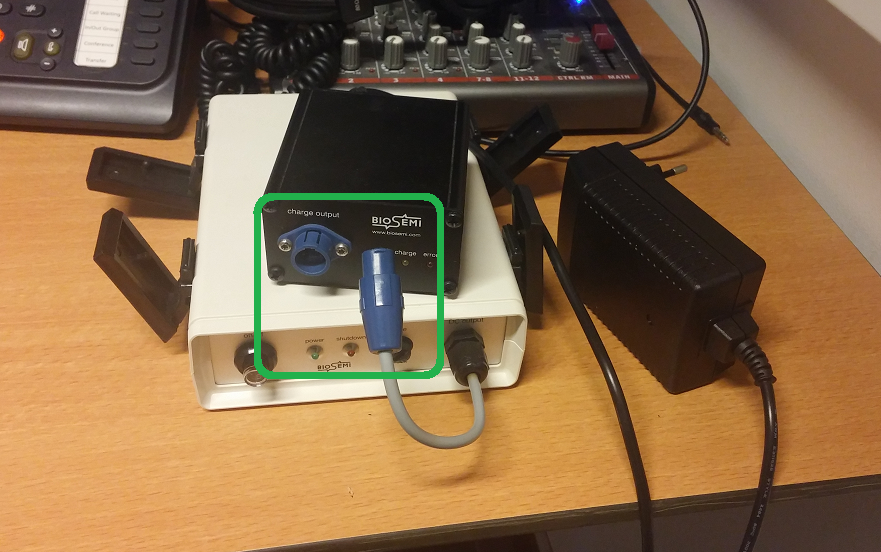
The battery of the BioSemi amplifier is the large block underneath the block in which you plug in the electrode bundle. First, remove the cable circled in red by pulling it out. Do not remove the cable circled in green:
Disconnect the battery from the amplifier by clicking all four black locks sideways and up. Take the battery to the control room.
In the control room, you’ll find a spare battery and the charger. Connect the empty battery to the charger by connecting the blue parts (circled in green) and plug the charger into the socket. You can leave the battery connected with the charger for indefinitely time. The charger will keep the battery in full state of charge, but will not overcharge the battery. Take the spare battery and connect it to the amplifier in the experiment room by adjusting the two cables and the four black locks again.
Two days after you’ve finished running your experiment, return to the lab and swap the batteries so that both batteries will be fully charged for long term storage.
Make sure your analysis pipeline is checked with your pilot data before analyzing your experiment data. Make sure you know what you do! Check other resources on how to analyze your data.
Useful links
- Galvanic skin response info (note: use Default_gsr_resp.cfg configuration file)
- Tutorial with EEGLAB
- Respiration belt info