
How-tos
Infant experiments with the arm-mounted babyEyeLink
If you have suggestions on how to improve this document, or find mistakes, please send them to ilslabs@nulluu.nl
Introduction
This page aims to give you a step-by-step guide to running your own infant experiment with the EyeLink 1000. Our arm-mounted EyeLink eye tracker is located in room K.09. Technical details about the set-up can be found here.
This page is always under construction. If you find mistakes or have things to add, please send them to Iris Mulders.
Recipe for a baby eye-tracking experiment
- Step 1. Before you start, you’ll need to learn about how we work in the lab and about the equipment.
- Step 2. Implement your experiment and create stimuli.
- Step 3. Test your experiment in K.09.
- Repeat steps 2 and 3 as necessary.
- Step 4. Calibration.
- Step 5. Pilot and prepare for subjects.
- Step 6. Convert your data, inspect it in iSpector, and prepare for analysis.
Step 1. Before you start
Support and opening hours
- Read the Introduction Guide to ILS Labs and follow all the steps there to create the user accounts etc that you will need.
- You can reserve the baby eye-tracking lab through the reservation system. Don’t block whole weeks, only reserve the timeslots that you will actually be in the lab. Please unreserve the timeslot if an appointment is canceled.
- For details on opening hours, see this page.
- Contact Desiree Capel to discuss your experiment design, and participant recruitment.
- Contact Iris Mulders to discuss your experiment design, and for a tutorial on how to use the equipment.
- In the time period that you are working on your experiment, attend the lab user meetings and the babylab user meetings.
- Always report any problems to lab support immediately: go to room 0.09 on the first floor, or alert the support staff by email or phone.
Equipment: architecture of the set-up
In remote mode, the EyeLink 1000 system samples one eye at 500 Hz, using infrared video based tracking technology. Freedom of movement is 32 x 21 cm at a 60 cm distance; gaze position accuracy is 0.4 degrees.
The SR Research EyeLink 1000 System consists of two computers and a high-speed camera with an infrared illuminator. The computers are named according to the SR Research terminology:
- Host PC (EyeLink PC): controls the eye-tracking system and data sampling. The Host PC was configured by the manufacturer, SR Research, and runs the software that controls eye tracking and data sampling. It contains routines to calibrate a subject and to calculate, visualize, and store on-line gaze positions. Gaze positions are corrected for (small) head movements through the use of a target sticker on the participant’s face; freedom of movement is 22x18x20 cm (horizontal x vertical x depth). The eye-tracking software on the Host PC runs under DOS, and is rarely operated directly by the experimenter. During an experiment, the Host PC is controlled by the experiment program ZEP.
- Display PC (im-lab-k09-01r): controls the presentation of stimuli and the acquisition of subject responses. The Display PC is equipped with two monitors, one in the operator room and one in the participant booth. You can access the ILS Labs data server from the Display PC. The Display PC is a dual boot machine, offering a choice between Linux (default) and Windows 10.
- Video Recording PC (im-lab-k09-02): Optional (but well recommended to use) system to be able to record behaviour of the infant for on the fly and/or post measurment monitoring or scoring of behaviour. Using OBS with the specialised ILS screen software setup (& hardware wiring), you can overlay and blend the stimulus screen with the video feed, so you can later inspect what happened when during the experiment. You could later decide to use the ILS Labs Video Scoring program, or other software, like ELAN (not installed at ILS as of yet) to manual-code the recordings you made.
The Host and Display computers communicate over a (crossover, red) ethernet cable using SR Research software.
We have a special illuminator for use with infants under 9 months; always check that you are using the right illuminator (see Step 3 below).
Practicing camera setup and calibration
Step 4 gives a summary of the information from the manual, and outlines how to perform camera setup and calibration. Working with the equipment does require some instruction and practice; please read the information in Step 4, and contact Iris Mulders for a tutorial.
Accessing scripts and data on other computers
The baby eye-tracking lab is primarily meant for running experiments; you are expected to do some of your experiment preparation, and all of your data analysis, on computers outside the baby eye-tracking lab (for instance in our practicum room). Use the ILS Labs data server to safely store your data, and to access your data on other computers.
Step 2. Implement your experiment and create stimuli
Talk to Maarten Duijndam about what exactly you want your experiment to do, he can help you with the implementation.
Boilerplate experiment
To get started, a (very old) boilerplate experiment for a preferential-looking/listening eye-tracking infant experiment can be found here. It’s probably a good idea to get started by running the boilerplate experiment together with Maarten or Iris in the lab.
To see what the boilerplate experiment does, work on a computer in K.06 or in K.09, logged in to Linux OS (New BeexyBox) [Ubuntu 16.04].
To run the boilerplate experiment preflisten.zip, download it from this page to your home folder ~, and unzip it there.
Rename the experiment directory, and your zep script with a name specific to your experiment:
- experiment directory preflisten rename to your own experiment name YOUROWNEXPERIMENTNAME
- experiment script preflisten.zp rename to YOUROWNEXPERIMENTNAME.zp
Now double-click the file linux-terminal.sh in your experiment directory. A message pops up: “Do you want to run “linux-terminal.sh”, or display its contents?”. Click “Run in terminal”.
In the terminal that pops up, type zep YOUROWNEXPERIMENTNAME.zp.
In the ZEP control window that opens, click the Start button to start the experiment. Follow the directions on the screen to continue. If you want to try out the experiment without an eye tracker, choose the simulated eye-tracker.
To abort ZEP at any time: press <alt-F4> (with confirmation box) or <ctrl-break> (no confirmation).
Check out what the boilerplate experiment does and if you want to have substantial changes made to the flow or nature of the experiment that you need help with, fill out the support form here.
If you’re not a regular Linux user…
… you may experience some mild confusion because things work a little differently than you may be used to. Some hints:
- Some quick tips on working with the Kubuntu operating system can be found here. Quick take-away bug fix from this page: f the systems locks you out, use use the keys CTRL + ALT + F2, followed by CTRL + ALT + F7 to get back in.
- For a short primer on Linux commands and conventions, see Working with Linux. Very useful!
Create your own stimuli
It is recommended that you create and try out a few stimulus materials on the actual setup you will use to run your experiment, before you move on to creating all your stimulus materials on other PCs. This way you can sort out all technical details, before creating all materials in a potentially ‘wrong’ way. Get help from Iris Mulders or Maarten Duijndam the first time you work in K.09. They will also give you some pointers on how to work with the equipment; all of that information is also detailed in Steps 3-5 below.
Creating pictures
Pictures need to be .png for use in ZEP. Maximum size is the size of the screen (1280×1024 pixels). The boilerplate experiment randomly presents babyfriendly pictures.
You can name your pictures using a system that makes sense to you, but if you use meaningful pictures, be aware that the naming convention in the eye-movement data files that you will obtain is ConditionnameItemnumber, with the item number spanning three digits and the condition name spanning maximally 5 letters. Example: abcde001.bmp, vwxyz001.bmp, etc. (This naming convention is also used to name the stimulus pictures if you want to display your visual stimulus when you inspect the eye movements in iSpector – see below).
As a general note, please make sure to never use spaces in file names; spaces in file names are supported in only a limited set of environments, and almost invariably lead to problems at some point in other applications. It is best to avoid them no matter what. In addition, note that some of the programs you are going to use are case-sensitive. So to be on the safe side: use lower case letters only.
Creating sound files
The easiest way is to record all your stimuli in one or a few big files and cut them up later. Instructions for recording sound files in the phonetics lab are here. Make sure to record in 48000 Hz, and double-check that it sounds OK on BABET1.
It’s important to make sure that all your trials sound about the same in terms of volume etcetera. Ways to control this are detailed in the recording howto.
To cut your stimuli into separate sound files, you can use Praat. Praat is installed on all lab PCs, including the PCs in K.06, both under Linux and under Windows. Some useful Praat scripts are available on the Resources page, here. This zip file contains:
- read_all_files_in_dir.praat: a Praat script to read all files in a particular directory in to Praat (the regular interface only allows selection of one file at a time)
- findonset.praat: Praat script for skipping to the next sound (useful in a file with long silences)
- insert_silence.praat: Praat script to insert a fixed amount of silence into all sound files in a particular directory. (See below).
- Silence.wav: 2000 ms of silence – you probably won’t need this.
Some hints:
- To open a long sound file, use Read -> Open long sound file. Select the file in the ‘Praat objects’ window, and click ‘Edit’. A new window with a waveform representation will open, that will allow you to cut out the stimuli.
- To cut out an auditory stimulus, select it in the waveform representation (you can listen to the selection by pressing the corresponding part of the bar at the bottom), and save the selection (File -> Write sound selection to WAV file).
- Save your sound files under a name that makes sense (condition and item number, for instance, but anything else is fine too). Make sure there are no spaces in your filenames!
- If you have very long silences in your recording, you can look for the onset of the next stimulus using the ‘find_onset’ script. (Otherwise it’s not particularly useful, easier and more accurate to find and clip the stimuli by hand).
- Praat can open only one sound file at a time with Read -> open. To open all files in a given directory in Praat, use the script ‘read_all_files_in_dir.praat’. (Praat -> new praat script, File -> open. Ctrl-r to run script).
Create your own stimulus file
Specify your stimuli in /modules/stimuli.zm.
Eye-movement data files
In the eyetracker_eyelink_infant.zm, set which kind of data file you want (zep-generated .csv, eyelink data file, or both). Search for data_file_format.
Infant calibration
You can specify calibration type in eyetracker_eyelink_infant.zm, too. For infants, use 3 point HV3 calibration (this is CALIB_TYPE_3C in ZEP; other options are 3A, 5B,9). Do not repeat the first point, and use Force Manual Accept. Don’t do drift checks for infant experiments: drift checks make the experiment longer, and recalibrating isn’t really an option with infants anyway.
Preparing/finishing stimulus files under Windows
You can finish preparing your stimulus file outside the lab, to free up the lab for running actual experiments. You can work in the terminal room (K.06) under Linux; or at home or on your work PC, using the Windows version of ZEP (for downloads and documentation see the ZEP homepage).
Here are some known issues with preparing stimulus files under Windows:
- DO NOT use Microsoft Word or Wordpad to prepare your files; use a proper text editor instead, such as Notepad, Notepad++, or TextPad.
- Your files need to have DOS/Windows line breaks, and the character encoding has to be UTF-8.
- TextPad gives you usable files if you save them using File -> Save as -> File format: PC, and Encoding: UTF-8.
- To set the default encoding in Notepad++: go to Settings -> Preferences -> New Document/Default Directory, and select UTF-8 as the encoding, and ‘Windows’ as the Format. To fix a wrongly encoded file, go to Encoding -> Ansi and save.
- Notepad will give you useable files if you use ‘save as’ and specify UTF-8 as the font encoding.
Back to Step 1. Before you start
Up to steps overview
Step 3. Test your experiment in K.09
Check the illuminator and lens
The large rectangular panel beside the camera is the infrared light source/illuminator; we have two illuminators which correspond to two different sets of wavelengths used:
- In infants under about 9 months, the eye is not fully developed and it reflects differently than the adult eye. Therefore you need to use the 940 nm illuminator for infants under 9 months, and the 16mm lens with the lock screw at 2.0 (the lens is not critical, but may help – it has a smaller range in which you can focus than the lens for older children/adults).
- The 940 nm illuminator does also work with children older than 9 months, and even with adults, so if your participants are right around the 9 month mark, it’s probably best to use the 940 nm illuminator.
- For infants older than nine months and for adults, use the 890 nm illuminator. With this illuminator, we use a 16mm lens that has a wider focus range.
You can identify the illuminator by a label that is stuck on the side – it will have 890 or 940 somewhere in the mode number. If necessary, use an allen key/wrench to exchange the illuminator and be sure to plug the power cables from the illuminator into the camera block. The 16mm lens to use with infants under 9 months old has a locking screw and index line aligned underneath the 2.0 setting printed on the lens (IRIS wide open). Ask for help from Maarten Duijndam or Iris Mulders if you are unsure.
Starting up the computers
- In order to avoid possible damage as a result of power surges, the most sensitive equipment should be powered up last. The order in which the equipment should be powered on is:
- The power strip that controls the power for all the equipment in the experimenter room. It is located under the table that holds the EyeLink/Host PC monitor.
- Button box: if your experiment uses a button box, make sure the USB cable of the button box in the experimenter room is connected; also make sure that the USB cable is unplugged from the button box in the participant room (this button box is used in some adult experiments). You can just plug/unplug the cables at the button box itself, no need to mess with where they are connected in the PC!
- If you intend to use video recordings, start up the Video Recording PC (im-lab-k09-02) now. By default, the display PC will boot up in Linux OS [Kubuntu 16.04]. You can also select Windows OS, use the arrow buttons to do that.
- Start up the Display PC (stimulus presentation; im-lab-k09-01r); by default, the display PC will boot up in Linux OS (New BeexyBox) [Ubuntu 16.04].
- Switch on the arm-mounted display, using the small button in the bottom right corner (Eye Tracker screen). Switching this one on will also trigger the EyeLink measurement device (camera + lens hardware) to power up (This is a nifty feature of the master-slave power strip in the participant room, which is on the floor hidden behind the curtain – you won’t need to touch this power strip at all.) NB: if the monitor is sleeping the camera won’t switch on, but it should come on as soon as you have an image on the monitor.
- Switch on the EyeLink Host PC: the Host PC boots into DOS and starts up the EyeLink software by default.
Always shut down in reverse order (see below).
Monitors
By default, the monitor inside the participant booth is set up as an extension of the experimenter monitor outside the booth. This allows you to see information about the progress of the experiment on the experimenter monitor.
This setup means that the monitor inside the participant booth shows a fairly empty screen with no icons. If the participant monitor looks exactly like the experiment monitor, they are set in clone mode, and that is not what you want. To fix this, choose System tools -> Display in extended mode to set up the participant monitor as an extension of the experimenter monitor.
This does mean that you have to start your experiment in the experimenter room, and move inside the booth/participant room to see your experiment run.
During the experiment, you can press F5 to see the stimulus together with the participant gaze, in the ZEP control window on the experimenter monitor.
Video recording
You will want to record video of the infants to later check what they were doing during the experiment. For more information, see the video-recording howto.
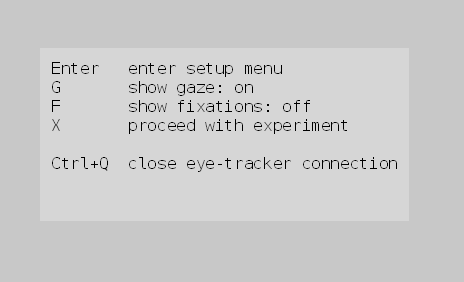 |
| Zep Eye-tracking Menu |
- Press Enter to go to the eye-tracking setup menu.
Back to Step 2. Prepare your experiment
Up to steps overview
Step 4. Calibration
This section outlines how to perform camera setup and calibration of infants in the context of our lab. The full setup procedure for the EyeLink Remote can be found in the EyeLink 1000 User Manual, section 3.2.4, pp.55-61, and sections 3.7 and 3.8, pp.69-74. The EyeLink 1000 User Manual is also available in hard copy in room K.12. The manual does not give a lot of information about calibration of infants specifically; the information below comes from SR Research support and our own experience. If you have something to add, let us know!
Working with the equipment does require some instruction and practice; please read the information in this section, and contact Iris Mulders for a tutorial.
Starting the experiment software
- If you want to record video during the experiment, start up the OBS program first. If you want to record the calibration process too (the EyLink Menu will not be included in the video, however), you should also start the recording now. Otherwise, start the recording after successful calibration.
- By default, the monitor inside the booth is set up as an extension of the experimenter monitor outside the booth, which allows you to see information about the progress of the experiment on the experimenter monitor. (if not, choose “System tools -> Display in extended mode” to set the monitors up like this).
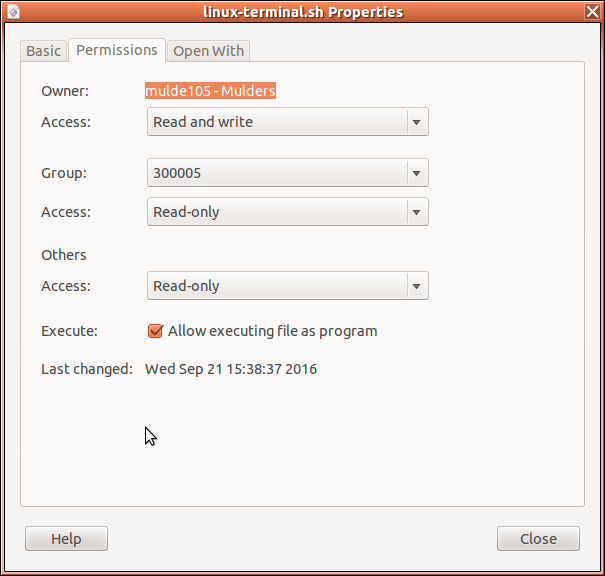
- Replace the linux-terminal.sh file in your experiment folder with a version of the shell script that allows you to run your experiment locally: linux-terminal-local-UILOTS.sh (right-click>Save Link As…). To re-enable execution of the file right click it >> properties >> Permissions and tick the box that reads ‘Allow executing file as program’. See this page for more information (and the update here).
- Start your experiment in ZEP using linux-terminal-local-UILOTS.sh. NB: if you move your experiment between Windows and Linux, it may happen that the executable bit on the file linux-terminal-local-UILOTS.sh is lost, in which case the system will simply open the file in a text editor instead of offering to run it in the terminal. If that happens, right-click the linux-terminal-local-UILOTS.sh file in the window manager, go to ‘Permissions’, and check the box ‘Allow executing file as program’:
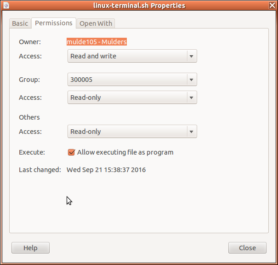 Then try again.
 - Press the ‘Experiment’ button and change the experiment status to ‘piloting’ or ‘testing’, depending.
- Create a participant and select it (participant ID has to start with ‘pp’, for instance pp001, pp002 etc).
- Press ‘Start’ to start the experiment. Follow the instructions on the screen, until you see a screen that looks like this:
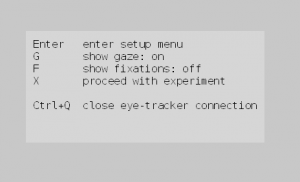
ZEP Eye-tracking Menu - Press Enter to go to the ZEP camera setup menu.
- Press Enter again if you want to ba able to switch this screen between monitors, using the arrow keys.
Camera setup
When your experiment script opens the connection to the EyeLink Host PC, you will see the following screen appear on the Host PC:
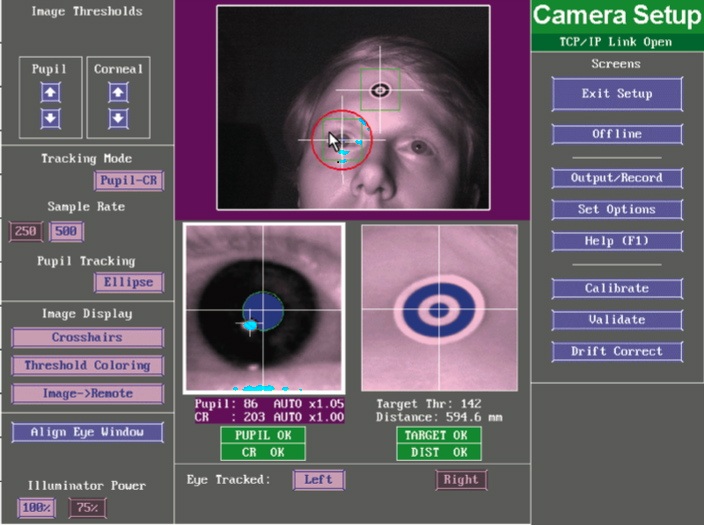 |
| EL1000 setup screen |
In principle you can operate the software from the EyeLink Host PC keyboard by either clicking on the function you need with the mouse, or by using the corresponding keyboard shortcuts (for instance, press c to enter the calibration routine). However, when you are running an experiment using ZEP or any other experiment program, it is advisable to control the communication with the eye tracker through the experiment program, using either the Display PC keyboard in the experimenter room, or in the participant room. The commands that are not implemented (such as illuminator level and pupil threshold adjustment) can be done with the mouse directly to the Host PC, but things like starting calibrations are best done through the experiment/display software, to prevent miscommunications between the EyeLink Host PC software and ZEP.
When the ZEP script reaches the camera setup part, you will just see the camera setup screen on the Display monitor in the participant room. The screen indicates the keys corresponding to the menu options that are available to you at this point:
- Enter will take you to the views of the camera image
- c will take you to the calibration screen
- v will take you to the validation screen
- d will perform a drift check (you won’t need to invoke this option)
- Esc will take you out of the camera setup menu, back up to the eye-tracking menu
To start the setup procedure, press Enter to see one of the camera views (head view, eye close-up, target sticker close-up). Pressing the left or right cursor key will switch between camera views. Press one of these cursor keys to switch to the head view.
Place a target sticker on the participant’s face. For infants, the forehead may be too small, resulting in frequent ‘NEAR EYE’ warning messages for the target sticker if it is placed there. For infants with small foreheads, it is recommended to put the target sticker on the cheek or even the chin. Put it on left side of the face (same side as the camera) for the largest amount of coverage while the head is turning, to maximize the camera’s view of the sticker.
Adjust the height of the participant monitor so that the participant’s eyes are level with the top half of the monitor. Adjust the monitor’s angle to match the angle of the infant’s face: if the infant’s face is perpendicular to the floor, make sure the monitor is too, if the infant is lying in a car seat, tilt the monitor to make it match the infant’s face angle.
From the Host PC, click on the pupil of the eye that you are going to measure. Try to click on the pupil when the eye is open. This will set the pupil threshold automatically – ideally it should be above 75. If necessary you can also adjust the pupil threshold by clicking the arrows on the host PC. Aim for a value where the whole pupil is dark blue, and no areas in the iris are dark blue.
A green circle and a red box will be drawn around the eye, and a crosshair through the eye. A white cross will be drawn through the target sticker, and a green box will be drawn around it. The pupil and target sticker should be in the middle of the screen.
In the participant area, focus the camera by turning the lens. Focus on the target sticker (the eye will be too small).
The participant should be positioned at about 600-650mm from the camera (500-550 for the 940nm illuminator with infants younger than 9 months). In the experimenter room, you can check the ‘DIST’ status message below the camera image on the Host PC to see what the distance is. In the participant room, a ruler is displayed in the target sticker view. Err on the side of ‘a bit further away’, as the infant will probably move closer to the screen when the experiment starts.
You’re looking to get an image where the pupil appears a solid dark blue with a green line drawn around it, and the CR (corneal reflection) in turquoise.
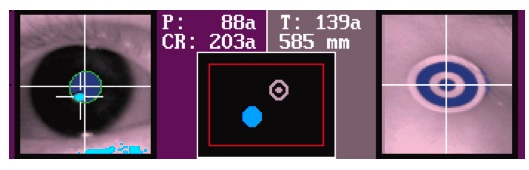 |
| EL1000 eye image |
When you have an acceptable image of the eye, press Esc to return to the menu, and c to open the calibration routine. The calibration routine consists of the timed presentation of three points on the screen. When the infant seems to be looking at the dot, press Enter. The calibration points will be presented on the screen in random order. Press Enter for each calibration point. Be quick about it, don’t let the infant’s attention dwindle. You can press Backspace to redo the last calibration point. Pressing Home displays an attention grabber at the position of the calibration point.
If there are problems with the camera setup, the system will not move forward to the next calibration point when you press Enter, it will seem to ‘get stuck’ at the presentation of a calibration point. If this happens, the EyeLink Host PC screen will probably tell you that the pupil is missing.
While the participant is doing the calibration, look at the image of the eye at the bottom left of the EyeLink Host PC screen, and check for the following aspects:
- Watch the pupil and the CR reflection to make sure they are solid at all angles and no unwanted competitors pop up.
- Make sure that the pupil and the target sticker stay neatly in the red box at the bottom of the screen.
After completing the three calibration points, the system will tell you that calibration is successful, but beware! ‘Successful calibration’ only means that there was a fixation during each calibration point – it doesn’t mean that the fixation was on the calibration point. You have to check that yourself, by looking at the pattern that results after calibration. The pattern has to match the calibration points.
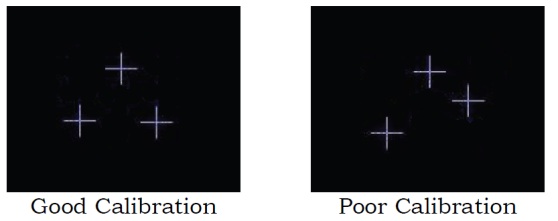
Infant calibration result
If the crosses do not match the pattern that the calibration points were presented in, your calibration is not good, and you cannot proceed! Try again. If it still doesn’t work, press Esc and then Enter to return to camera setup, and make adjustments there.
Things to check for in case of problems (in decreasing order of likelihood):
- Check that the target sticker is not too close or too far away from the eye; if it is, EYEDIST will appear in red (see EyeLink User Manual).
- Check that the target sticker is not too far off to the side or top of the participant’s face (ANGLE).
- Check the distance to the monitor. (DIST)
- If you see that one calibration point lies far outside the grid, this is caused by the child fixating somewhere else than the calibration point. Redo the calibration, use the attention grabber if necessary.
- The pupil threshold bias may be too high or too low (Click the arrows in the top left of the EyeLink control screen to adjust pupil threshold. You can also press the up or down arrow keys on the keyboard to adjust, but this does not always work during an experiment). Make sure you have a good solid image of the pupil, and that the pupil image doesn’t ‘merge’ with eyelashes or other dark parts of the image.
- If the right eye is giving problems, you can try to measure the left eye instead: go to the EyeLink Host PC, and select which eye(s) to measure by pressing e (toggles between left and right eye).
- Make sure nothing is obscuring the target sticker. (Use our assortment of hair clips and headbands to keep any hair off the forehead).
Once you have a stable image of the pupil, return to the calibration by pressing c.
If the calibration is good, press Enter to store the results! If you forget to do this, the previous participant’s calibration will be used and your data will make no sense.
You can follow the calibration with a validation routine to see if your calibration is reliable, but with infants it is better to just skip this step.
After saving the successful calibration results, leave the setup menu by pressing Esc and then proceed to the experiment by pressing X (i.e. just follow the instructions on the screen).
During the experiment:
- To abort ZEP at any time: press alt-F4 (asks for confirmation) or ctrl-break (does not ask for confirmation).
- Press F5 to see the stimulus together with the participant gaze.
To get rid of artifacts in the presentation of the calibration dots, lower the resolution of the secondary monitor (ask Iris for help).
If something goes wrong during your experiment
Some known issues; please do still report these issues if they happen to you!
- Occasionally the validation will show large offsets for all calibration points. The offset will be very similar for all points, and really large (like 4 degrees). Our currrent idea is that when this happens, the calibration somehow wasn’t saved via the ZEP program as it should be. To fix this, you can redo the calibration, and accept this calibration on the EyeLink host PC. Then it is saved and from our previous experience it won’t happen again so you can continue the normal flow. (Only accept a calibration result on the host PC in this situation! Generally it is not a good idea to operate the EyeLink directly from the EyeLink PC as this may confuse ZEP).
- There used to be a known bug in ZEP that sometimes causes the calibration screen to be superposed over a trial that no eye movements are being measured on (a filler item). We think we’ve fixed this. If you encounter it anyway, please let us know!
- There used to be a known bug in the Linux graphical interface, that occasionally caused the whole operating system to shut down and return you to the login screen. In the eye-tracking experiments, this mostly seemed to happen at the transition between the practice block and the first test block, so no actual data was lost. We think this should be fixed in the Kubuntu version that we are running now, if you encounter it anyway, please let us know!
What to do when the experiment crashes/does extremely strange unexpected things:
- Let the parent know that there’s a technical problem. Don’t panic – the worst thing that can happen is that you’ll end up with no data for this participant, which is a pity but not the end of the world.
- Note in your experiment log at which trial the problem occurred. You can read off the trial item number and condition from the status line on the EyeLink PC (bottom of the screen), or off the ZEP control window.
- Decide on a course of action. If you’re still at the start of the experiment and the participant hasn’t seen any experimental trials yet, you’ll want to keep the participant there and restart the experiment. If the problem occurs further on in the experiment, the best course of action probably is to give up and send the participant home. (Apologize profusely).
- Copy the ZEP output that you see in the terminal, to a file and save it. It may contain important information for lab support to prevent the problem from occurring in the future.
- Restart the experiment if you want to, using the same participant number etc; the old data will not be overwritten because the new session will be saved to a new file.
- If ZEP wasn’t shut down properly, you will get a message that the database is locked. To unlock the database: make sure ZEP is not running, and run zepdbcheck -fix in the terminal. See the ZEP manual for more information.
- If you can’t get ZEP to shut down at all, try to kill ZEP from the command line: pkill zep. If that doesn’t work either, try pkill -9 zep.
- Please let lab support know what happened: go to room 0.09 on the first floor, or alert the support staff by email or phone. Be as specific as you can about what you were doing at the time of the crash.
- The .edf file from the failed run of the experiment will not be transferred to the display PC, since that happens only at the end of the experiment. If you were almost at the end of the experiment, you may want to retrieve the .edf file for analysis, if so, ask lab support for help to do that, on the same day (may involve running zepgetedf sessionnumber_blocknr, edfinfo).
- Ask lab support to run chkdsk on the EyeLink host PC (to check the host PC desk for lost clusters etc).
Back to Step 4. Calibration
Up to steps overview
Step 5. Pilot and prepare for subjects
Technical pilot
To make sure that you have done everything right, you need to pilot your experiment. Change the experiment status to ‘piloting’ in ZEP, and first run a technical pilot on yourself.
To ensure that your audio stimuli play correctly even if the network has hiccups, run your experiment from the local disk rather than running it from the network drive; carefully follow the instructions in the howto Properly run a ZEP experiment. You will want to run your ‘actual’ experiment locally, always.
When that seems OK, run your experiment with some more pilot subjects (ask for some friends’ help – it doesn’t have to be babies right away). Note: while you are running actual participants, you will want to make sure the red light outside K.07 is burning, to indicate to people outside that they need to be quiet and cannot barge in. The red light comes on when you switch on the light in the kitchen – the light in the experimenter room and in the participant room do not make the red light come on. Don’t overuse the red light, switch off the lights when you are not in the lab.
After running your technical and behavioral pilots, go through all the steps below and look at the eye movement data in iSpector, and do a mock analysis of your data to double-check all your codings. Also check whether the randomization of your stimuli works as intended.
Double-checking everything before you actually run the experiment may seem time-consuming and tedious now, but it will save you time in the long run.
Find (pilot) subjects
Infants:
- For help with recruiting infant experiments, consent forms, etc contact Desiree Capel.
Adult controls (if you need them):
- Help with recruiting adult participants is available here.
- An instruction template for adult participants can be found in the resources. A template sign-off list is also provided.
Back to Step 3. Test your experiment in K.09
Up to steps overview
Step 6. Convert your data, inspect it in iSpector, and prepare for analysis
Eye movement data
By default, ZEP outputs the eye movement data in .edf files, an EyeLink-defined format. In addition, you can make ZEP output eye movement data in .csv files, in a format controlled by ZEP (specify this in the EyeLink module if desired). Both types of output files will be written to the data/YOUROWNEXPERIMENTNAME/dat directory.
When you run your experiment with a simulated eye tracker, the .edf format is not available, and you will get the .csv format instead (not that the simulated eye movement data will be of much use to you).
- After you are done running your subject(s), go to the data/YOUROWNEXPERIMENTNAME/dat directory (cd data/YOUROWNEXPERIMENTNAME/dat in the terminal) and type mkasczep *Enter, that is, run the script mkasczep on all the .edf files in your dat folder. The script converts the .edf files to .asc format, and names the .asc files to a name that is understood by the analysis program Fixation (which you will probably not use, but it is used for other experiments). The general name format for your .edf files is SessionNumber_ListNumber_ParticipantNumber.edf. The name generated by mkasczep for the .asc files is Experimentname_ListnumberBlocknumber_Participantnumber.asc.
- Make a folder edf in your YOURTHREELETTEREXPERIMENTNAME folder (as a sister of your dat, img etc folders). After your .edf files have been converted to .asc, move the .edf files to this edf folder. (otherwise mkasczep will convert them again and again).
When you’re done for the day
Power off the equipment in order of sensitivity (the reverse of how you switched them on).
- Close the EyeLink program on the Host PC by pressing <ctrl-alt-q> or clicking ‘Exit EyeLink’ in the ‘Offline’ menu of the EyeLink Host software.
- Switch off the Eye tracker display (switching off the participant monitor will also switch off the EyeLink camera).
- Shut down the Display PC.
- If it was on, now shut down the Video recording PC (make sure you’ve saved your recording and backed up your files).
- Switch off the Host PC.
- Switch off the main power switch (under the desk).
Transport your data to a computer where you can check the data in iSpector
Use the ILS Labs data server to access your data on a different PC. Working in iSpector will be much faster if you copy your data to a local directory. If you want to use iSpector in K.06, copy your entire experiment data directory to D:\Users\eyetrack\data. (Just copy the directory carrying YOUROWNEXPERIMENTNAME that has dat and maybe img as immediate subdirectories – NOT your whole ZEP directory!) If you do any work there that needs to be saved, don’t forget to upload the resulting files to the data server when you are done for the day – in K.06 your data can be deleted from the local disk D:\Users\ by anyone!
Back to Step 5. Pilot and prepare for subjects
Up to steps overview