
How-tos
ZEP Tutorial for Linux
If you have suggestions on how to improve this document, or find mistakes, please send them to ilslabs@nulluu.nl
Tutorial ZEP – Adapt an existing template experiment (under Linux)
In this tutorial, you will create a ZEP experiment that runs a grammaticality judgment task. This document will guide you to do this step by step, working from an existing template experiment.
The template experiment that we will use as the base is a visual lexical decision task, where the participants get to see words and non-words, and have to decide as quickly as they can if the word they see is a word or not. The experiment records the answers the participant gives, and it measures response time, i.e. how fast the participant presses the button to give their answer.
Contents
- 1. Install ZEP and run the Visual Lexical Decision template
- 2. Get acquainted with the basic structure of the experiment
- 3. Check the output
- 4. Adapt the vislexdec experiment
- 5. Create a grammaticality judgment task
- 6. Change buttons to checkbuttons
- 7. Instructions
- 8. Data
- Function key cheat sheet
1. Install ZEP and run the Visual Lexical Decision template
Do you need to install ZEP?
Whether you need to install ZEP or not depends on where you’re working.
- if you’re working in Janskerkhof 13 (room K.06) or in Drift 10 (M’upr 1.07/108) ZEP is already installed there. The current versions installed on our computers are Windows () and Linux (). If these are not the versions you need, consult the ZEP download page to install the correct version you need.
- if you’re working on your own Windows or Linux laptop or desktop PC, you can install ZEP on your own computer. See below for how to do that.
- if you’re working on your own Mac laptop or desktop – just go to the lab. If you’re stubborn you could probably install ZEP in a Windows/Linux emulator on your mac, but life is too short.
How to install ZEP on your own Windows laptop/PC
Go to the download page on the new ZEP 2 beexy site to see the Linux install files. Download zep_2.7.2_amd64.deb to install the appropriate version of ZEP for the purposes of this tutorial.
Download the template experiment
- ZEP experiment templates are available on the lab website. Go to Resources at the top of this page, and open Experiment Scripts in a different tab in your browser. Read the page to see which templates are available. (Most templates are actually on the beexy website, as the Experiment page explains).
- Find the Visual Lexicon Decision template on the beexy website. (Note: you can use the most recent version of the template, for ZEP 2.7, for the purpose of this tutorial. If you ever need to find templates for earlier ZEP versions, for instance 2.4, you will need to go to the Beexy site, click Lexical Decision on the sidebar and then go to templates archive, then go to the templates for 2.4, and find the vislexdec.zip template for ZEP 2.4 there.)
- After downloading the vislexdec.zip file, unzip/extract it to your home folder. You will end up with a folder called vislexdec. This is the experiment folder we will be working with.
Run the template experiment
Double-check that you have the vislexdec in your homefolder.
Run the experiment vislexdec as follows:
- Navigate to the folder ~/vislexdec, and right-click the vislexdec.zp file and press open Open Terminal Here
- Your terminal has opened and you should be in ~/vislexdec folder. Type in your commandline zep {filename} which in this case is
zep vislexdec.zp
- hit enter. Your screen should look something like this (see terminal input):
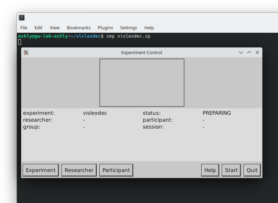
- An experiment control window opens. Click ‘Start’ to start the experiment, and then ‘Continue’ to run the experiment as a dummy participant.Note: if you don’t want the experiment window to take over your whole screen, hit F3 to make it appear in a separate smaller window, which can be resized. Press F4 to go back to full screen.
Read Experiment Control Windowfor much more information about the control window. - At the ‘Welcome’ screen in the experiment window, press space bar or enter to continue. Read the instructions on the instruction screen and run the experiment, pretending to be a participant.
Note: the instructions talk about using a button box. In response time experiments, it’s customary to use a button box for collecting responses because that is the most accurate way to measure response times. Since you won’t have a button box at your disposal if you’re not in the actual lab, you can simply use the mouse to click your way through the experiment for the purpose of this tutorial.

2. Get acquainted with the basic structure of the experiment
Now that you’ve run the experiment pretending to be a participant, let’s look at a time line of what it does, exactly:
The experiment consists of six parts:
- The welcome part (which displays the welcome screen)
- The instruction part
- The practice part (where the participant gets to practice with some mock stimuli)
- The pause part (where the participant can ask for clarification if necessary)
- The experimental part (where the participant responds to the experimental stimuli)
- The thank-you part, where a thank-you screen is displayed to the participant.
The programming code that makes all these things happen is located in the experiment script. We saw this script earlier namely vislexdec.zp, you can recognize the script by .zp at the end.
We will open the script in a text editor to see what’s in there, but before we do that, we’ll install some fancy syntax highlighting stuff that will make the script more readable.
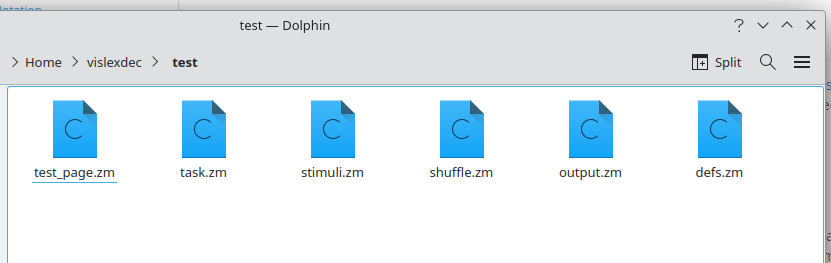
Download the zep.lang file here. Save it in your home folder (right click on the link and click ‘Save Link As‘. Or click on the link, copy all the text to a new file in Gedit or Kate and save as zep.lang)
- Open a terminal: press alt-enter, type Konsole, and open it or press Ctrl-alt-T .
- Type in (or copy-paste with Ctrl-C and Ctrl-Shift-V ) the following list of commands:
		 cd ~/.local/share
mkdir gtksourceview-3.0
cd gtksourceview-3.0
mkdir language-specs
cd language-specs
cp ~/zep.lang .
(the fullstop in the last line means ‘to this directory’ – don’t leave it out).

- Now open the file vislexdec.zp in Gedit or Kate: right-click the file and select ‘Open with’, ‘Gedit Text Editor’ or ‘Kate’.You will see about a page of code. Most of it will be incomprehensible at this point, and it is not necessary to understand every bit of the code (in real life, you will never build an experiment from scratch, you’ll always build on an existing template). But even without understanding most of the code, you will be able to see that there are ‘Part’s being defined.
- Take a minute to scroll through the file and see if you can identify the different parts. The first Part is called welcome, the second Part is phase1, and the third Part is thankyou. Part phase1 defines the task the participant carries out in the experiment (there is only one task in this simple experiment).
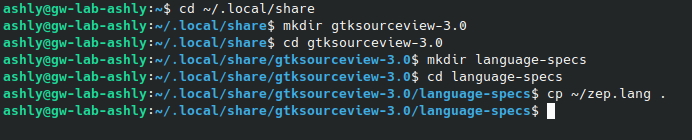
The task is defined in a module. Defining subparts of the experiment in separate modules makes it easier to exchange code snippets, and is helpful for keeping things organized. (For more information on ZEP modules, see Typical Experiment Structures. There are links that describe in detail the files that make up the vislexdec experiment.) - Go back to your explorer and navigate to the subfolder “test”, and open the file task.zm in your text editor.

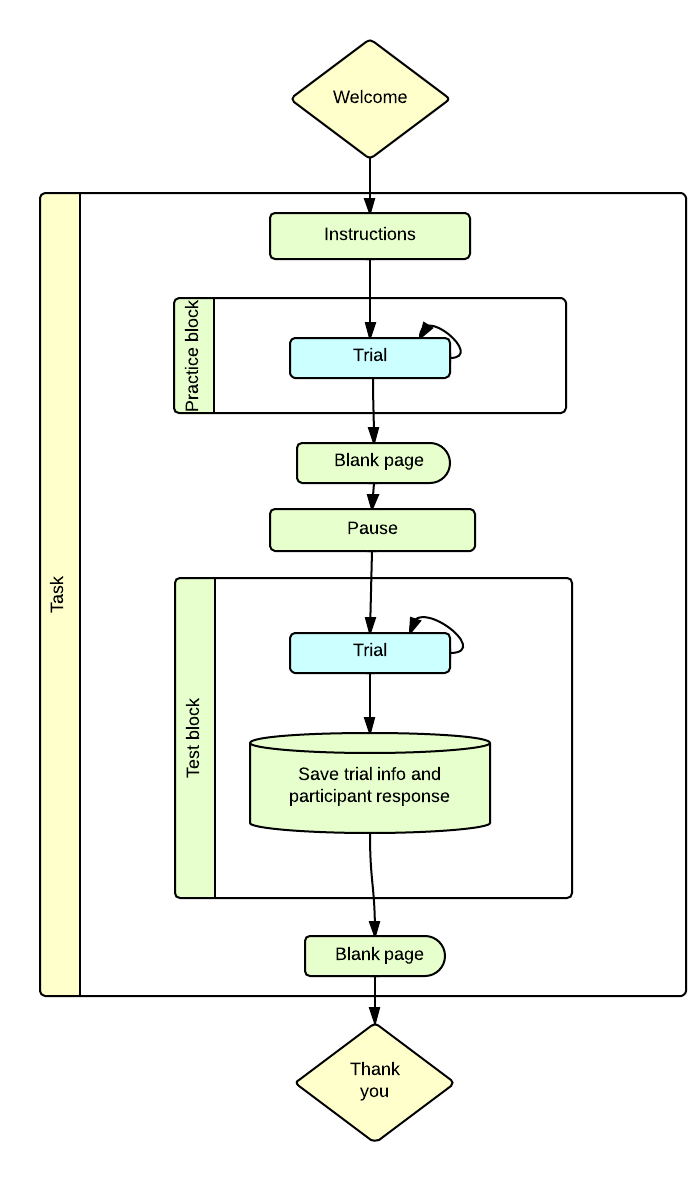
- Again, there is no need to understand all the details of the code, but you will still be able to see that various Parts and Blocks are being defined. The Blocktask contains a Part instructions, a Blockpractice, and a Block test. In the practice and test block, trials are repeated until all the trials have been displayed. After the practice block, there is a part that has no name and which just displays a blank page for 500ms; this is because it would look strange to go to the next part abruptly. (One of those things you don’t want to, but unfortunately would have to think about if you would program an experiment from scratch).
- Take a minute to locate all the parts and blocks in the script file, and how they are related to each other. We can visually display the course of the experiment as follows:
 The trials in the practice and test blocks are themselves complex elements, consisting of the following components:
- The fixation cross is the cross that is briefly shown before the word/non-word appears.
- The stimulus is the word/non-word.
- The response duration is the time frame within which the participant is expected to give a response (if the participant does not respond within this time frame, the experiment continues to the next trial).
- The intertrial interval is the amount of time a blank window is displayed in between trials (you will not even have noticed this, but it would look weird to go straight from one trial to the next, the small pause in between is needed to make the whole thing look natural).
In the practice phase only, each trial is also followed by feedback to help the participant understand the task (a green checkmark is displayed if the participant gave the expected answer, a red cross appears if the participant gave a different answer). We will ignore that for now.
We can draw a visual representation of the time line of a test trial as follows:
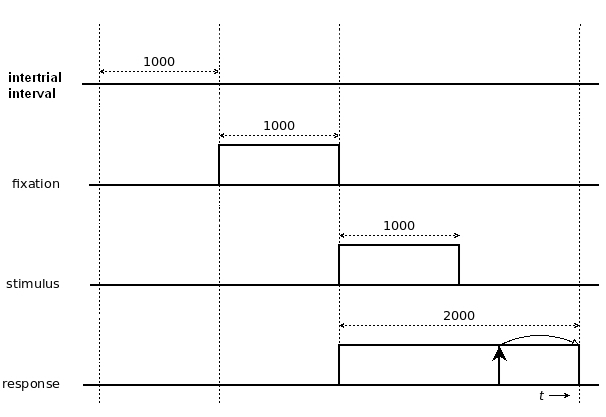
In the diagram above, you see a trial with an intertrial interval of 1000ms, a fixation cross duration of 1000ms, then a stimulus also with a display time of 1000ms, and a response interval, starting at the start of the stimulus interval, of 2000ms. If the participant presses a button (indicated by the upward arrow) during the response interval, the experiment continues to the end of the trial (indicated by the curved arrow). If the participant does not press a button at all during the stimulus interval, the trial ends anyway at the end of the stimulus interval.
The durations of these subcomponents of the trial can, of course, be changed; different experiments require different stimulus display times.
The values of these durations, and the trial itself, are defined in test.
The vislexdec task (as most ZEP experiment templates) has the following task-specific modules:
- defs.zm global variables, e.g. durations
- stimuli.zm defines the stimuli (content)
- test_page.zm specifies what a test page looks like (where the stimulus goes on the page, where the response buttons go, what the response buttons look like, etc)
- task.zm defines the task
- output.zm defines the output (participant responses plus stimulus info)
- shuffle.zm defines how the presentation of the stimuli is randomized
Assignment 1:
- Open /vislexdec/test/defs.zm in your text editor. Find the durations of the three trial components (fixation cross, stimulus, and response duration), and of the intertrial interval; that is, find the durations of the following variables:
- Duration of the fixation cross
- Duration of the stimulus
- Response duration
- Intertrial interval duration
3. Check the output
Let’s take a look at the most interesting part of an experiment from the experimenter’s point of view: the output.
The output is saved to a database, which is located in the db subfolder of your experiment folder. There are a few tools available to extract the information from the database to a usable format. (For elaborate information on the usage of zepdb2extract and all ZEP-related tools, consult the documentation Extracting Experiment Results Using Zepdb2extract.)
Assignment 2:
- In the console, make your way back to the vislexdec folder and type
zepdb2extract - then hit enter. (If you don’t know how to navigate through the terminal checkout the Working with Linux page.)
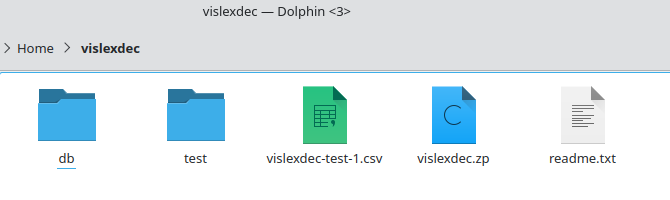
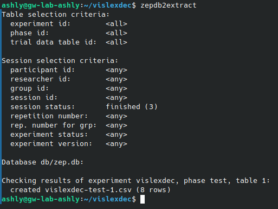 This tells zepdb2extract to output the data for the experiment in the current experiment folder (vislexdec) to an output file. Zepd2bextract tells you the name of the output file in the console (vislexdec-test-1.csv). You should see this file in your experiment folder now.
- double-click the output file to open it in LibreOfficeCalc. A Text Import Wizard opens, click OK.
- You will see that there’s a whole lot of information in the output file. First there’s a lot of information about the experiment and the session that is not particularly interesting to us now, feel free to gloss over this:
- dbid: the number of the database
- expid: the name of the experiment
- resid: the name of the experimenter (JD for John Doe here since you didn’t fill out that information)
- ppid; the ID of the participant (dummy here since you didn’t fill it out; usually this will be a number)
- grpid: group ID, does not apply here
- sesid: the session ID
- sesdate: the date the session was run
- sestime: the time the session was run
- sesrepexp: this number goes up when the same session is run again (completely irrelevant here)
- sesrepgrp: this number goes up when the same session is run again in the same group (completely irrelevant here)
- sesstat: status of the experiment session: 0= running, 1=stopped, 2=aborted, 3=finished, 4=failed.
- expstat: experiment status, 0=preparing, 1=piloting, 2=testing, 3=closed
- expver: experiment version
Then we get to the meat of the file: the stimulus info and participant response.
- trialnum: number of the trial
- id: stimulus number
- type: stimulus type
- word: the actual stimulus
- value: the participant response
- rt: response time: how long it took the participant to give his/her response
- correct: whether the response is correct or not (in this case: whether the participant correctly identified the word or non-word as such)
Which stimulus info and response data is output exactly, is defined in the test module output.zm.
- Open this module in your text editor. You will see that the record TestOutput is defined as follows:

record TestOutput
{
   int trialnum;       // trial number
   int id;             // item id
   ItemType type;      // item type
   string word;        // stimulus word
   int value;          // response value: 0=no, 1=yes, -1=timeout
   int rt;             // response time [ms]
   int correct;        // correct response: 0=no, 1=yes, -1=n.a.
}
So this is how ZEP knows which variables to output in the final columns of the output file (the other columns come for free in every experiment).
One thing to note here is that ZEP is a typed language. That means that every time a variable is introduced, you need to specify which type it has (integer, string, boolean, etc). So ‘int trialnum;’ above means something like: ‘we are introducing a variable called trialnum here, and it is of the type int(eger)’.
4. Adapt the vislexdec experiment
Now that we have a general idea of the structure of this ZEP template experiment, let’s start making small changes to it.
4.1 Make the experiment entirely self-paced
The task in the vislexdec experiment is auto-paced with a response duration of 2000ms, which means that if the subject does not respond within 2000ms, the experiment will continue to the next stimulus anyway. This is useful to make participants respond faster (they will want to ‘beat the experiment’). For the grammaticality judgment task that we are working towards, we want the experiment to be self-paced though.
Assignment 3:
- Change defs.zm to make the experiment self-paced, i.e. make the response duration open-ended (‘self’ refers to the participant, they’re the one who sets the pace). You can read how to in the comments.
Note: In ZEP, lines can be commented out using two forward slashes (‘//’). Also note that comments (as in any programming language) don’t modify the flow of a program in any way. - Update the history at the top of defs.zm to indicate what change you made. It is important to always update the history info in any file you change, because it is highly unlikely that you will ‘just remember’ if you need the information at some later stage (either for yourself or for when you mess it up and need help from someone else, – the other person will be better able to help you if they know what changes you made).
After you changed something, always try out your modified experiment to check that it works as you want it to.
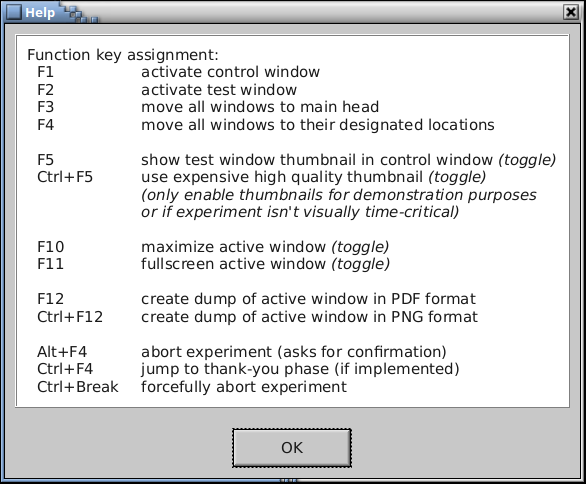
To abort the experiment at any time, press alt-F4 (this is the standard Windows command to close a window).
See the bottom of this page for more key functions or consult the Experiment Control Window page.
To break off the experiment without being asked for confirmation, you can also press ctrl-break.
If you get an error in the console, read it carefully and try to fix it.
4.2 Make some cosmetic changes
It is quite easy to change the way the experiment looks in terms of fonts and colors. By default, these aspects of the experiment are controlled in standard modules, which are located in a subfolder in ZEP’s installation folder. If you want to change a standard value, you can just copy the standard module to your own modules folder, and make changes there; ZEP will always give preference to the files in your own experiment folder.
Assignment 4:
- Change the color of the test page (the background color) in vislexdec. To do this, you need to get a standard module colors.zm. Standard modules can be found in your local ZEP installation; in the lab that is /usr/share/zep/<your zep version>/modules. Replace “<your zep version>” with the actual version of zep that you are using e.g. “2.4”. Remember you can deduce your experiment version from the use-zep-x.yy file in the experiment folder. (Alternatively, you can download the file colors.zm from the module colors page to \vislexdec\modules\ . However, this is a little tricky as the ZEP modules on the beexy website are the most recent modules, so if you’re running an older version of ZEP, they may not work).
- Copy the file colors.zm to your own /vislexdec/modules.
- Open the file, and change the color of the test page from gray to paleturquoise.
- Change the color of the buttons on the test page to any color you like. (Note that there’s a link to a list of predefined ZEP color names at the top of colors.zm).
- Run the experiment: type
zep vislexdec
in the console or press the up arrow to magically retrieve the previous console command.
- Admire the new look. (To stop the experiment, press Alt-F4 or ctrl-break).
4.3 Add an extra stimulus type
As it stands, only two types of stimuli are presented to the participant: words and non-words. We can extend the stimulus list to add some words of a different type: idiom words (an experiment like that was run in the lab (Brouwer 2011); it showed that idiom words, like non-words, are processed more slowly than ‘regular’ words).
Let’s add four idiom words (‘haywire’, ‘havoc’, ‘amuck’ and ‘jiffy’) to the stimuli.
Assignment 5:
- Open stimuli.zm. The stimuli that we already have, are defined in the Item table as follows:
{1, NON_WORD, "slirque"},
{2, NON_WORD, "crawse"},
{3, NON_WORD, "thwurp"},
{4, NON_WORD, "clem"},
----
{5, REAL_WORD, "white"},
{6, REAL_WORD, "travel"},
{7, REAL_WORD, "letter"},
{8, REAL_WORD, "clown"},
The numbers are stimulus numbers (item id), NON_WORD/REAL_WORD are the item types, and the final elements are the words/non-words themselves (in quotes because they are strings).
- Add to this table the four idiom words with the type IDIOM_WORD, and with consecutive trial numbers (item ids) 9-12.
- Remember that ZEP is a typed language. The variable ItemType is a variable of the type ‘ItemType’, which is not a predefined type like integer or string are, but a user-defined variable type. It is defined at the top of the stimulus file in ‘enum ItemType’. Since you are introducing a new Item type ‘IDIOM_WORD’ here, you will have to add IDIOM_WORD to the ItemType enumeration.
- Try to think of an idiom word to add to prac_items.
- Update the history at the top of the file to indicate that you added an extra stimulus type.
- Try out the experiment with these new stimuli (if you get an error, try to determine the cause of the error and fix it; ask for help if you need it).
5. Create a grammaticality judgment task
We are now going to use the vislexdec experiment as a basis for creating a grammaticality judgment task, where participants will judge sentences for grammaticality on a seven-point scale.
5.1 Copy and rename the vislexdec folder
Assignment 6:
- Close all script files that you have open, and close the console. (DO NOT delete the vislexdec directory, you will need to hand it in once you have completed the full assignment!)
- Create a folder called GrammJudg3btn. Copy the contents of your (working!) vislexdec folder to that directory, except for the csv file and the db folder. (The db folder contains the data of the experimental runs that you have done so far in the vislexdec experiment, so there is no need to copy it to the experiment folder for the new experiment).
- Also rename the vislexdec.zp script to GrammJudg3btn.zp
- Open GrammJudg3btn.zp and adapt the info in FILE, DESCRIPTION, and HISTORY at the top.
5.2 Remove fixation cross
For this grammaticality judgment task, we’re more interested in the participant’s judgments than in their response times. That means that we’re also not as interested in having the participants look at the stimulus display window before the stimulus is displayed, and we don’t really need to focus their attention there with the fixation cross. Let’s do a quick & dirty hack to get the fixation cross out of the way:
Assignment 7:
- Set the display time for the fixation cross in the GrammJudg3btn experiment to 0ms.
- Run the experiment to check that that worked: Navigate to the folder GrammJudg3btn, and execute:
zep GrammJudg3btn.zp
(Of course, this is a bit of a hack; deleting the fixation cross properly from the stimulus page – coded in test_page.zm – would lead to the same result, and would be a cleaner way to go about it.)
5.3 Replace stimuli by full sentences, and remove unnecessary response variable
We will now replace the words that we have used as stimuli so far, by sentences. These are the sentences we will use (from/inspired by Juffs 1996):
For the practice phase:
| Type | Sentence |
| FILLER_UNGRAMM | The police the thief killed when he was robbing the bank. |
| FILLER_GRAMM | Jane hurt herself when she fell off her brand-new green bicycle. |
For the experimental phase:
| Type | Sentence |
| PSYCH_MAKE_CONFLATED | Sam’s mistakes sometimes disappointed his parents. |
| PSYCH_MAKE_CONFLATED | The new English books interested the students. |
| PSYCH_MAKE_CAUSATIVE | Ghost stories often make little children frightened. |
| PSYCH_MAKE_CAUSATIVE | The slow progress made the leaders frustrated. |
Assignment 8:
- Replace the stimuli in stimuli.zm by the sentence stimuli above. Try to run the experiment.
We use the prefix FILLER to indicate that this sentences isn’t a real test.
When you try to run the experiment, ZEP will give you an error complaining about an undefined field ‘NON_WORD’ in test_page.zm. It specifies on which line in test_page.zm it finds the field NON_WORD. (NB: ZEP may also give you other errors if you’ve done something wrong, you should be able to fix those by yourself, but ask for help if not).
Assignment 9:
- Open test_page.zm for this experiment, and go to the line mentioned.
You can enable line numbers in gedit by clicking edit → preferences and then checking the box in front of “Display line numbers”. Then hit ‘close‘.You will see that the expression NON_WORD is used in the definition of the variable ‘correct’. We don’t actually need to define that variable at all in this experiment; we are trying to find out what the grammaticality judgments for the sentences are, and we have no set expectations about what people will answer. - Go to the lines in test_page.zm that ZEP mentions, and comment out the assignment of the variable correct.
- If you run the experiment now, it will work, and it will simply output ‘-1’ (meaning ‘not assigned’) for the variable ‘correct’. Since we like things neat and tidy, this is not good enough; we want to get rid of the variable altogether. The variable occurs four times (search the file for ‘correct’ to find the other occurrences): first it is initialized, then it is set to ‘-1’; and it is also used in the ‘finish’ event procedure:
on_event:finish()
{
    real correctness = 0;
    if (num_valid_hits > 0) correctness = correct ? 1 : -1;
    if (!test_page_overlay.start_feedback(this, correctness, FEEDBACK_DURATION))
    done(CONTINUE);
}
There’s no need to understand what that last bit of code does, exactly; just comment out (or delete) everything except for the ‘done’ function call, to make it look like the code snippet below:
on_event:finish()
{
    done(CONTINUE);
}
Also comment out the lines involving the variable ‘correct’ from output.zm, and from task.zm. (You can try to run the experiment and use the errors in the console to guide you).
- Run the experiment to see what everything looks like now.
As you will notice, we have three problems now:
- The white rectangle (canvas) where the stimuli appear is too small to fit the stimulus sentences.
- The display time for the sentences is so short that it’s impossible to read them in that time.
- The prompt text ‘is it a real word?’ in the practice phase makes no sense for this task.
Let’s fix these issues.
Assignment 10:
- Edit the appropriate module to make the display time for the sentences longer. Remember to always update the history info at the top of any file you alter!
- Edit the appropriate module to make the stimulus canvas bigger, and try it out.
- You may see that the sentences in the practice block are so long that they won’t even fit on a single line. (Depending on your monitor resolution and the default font on your system). Adapt your stimuli to break up the sentences in the practice block into two lines: put in a line break by typing \n (the standard command in programming to signal a new line) where you want the line break to appear in the sentence. Adding a line break should not be necessary for the stimuli in the test phase, just make sure the canvas is big enough to fit those. Run the experiment to check that all the stimuli look OK.
- Replace the text for the prompt in the practice part with something that makes more sense: look for the text “is it a real word?” in the module test_page.zm, and replace it with the following text: “is it grammatical?” Run the practice block to check that that worked.
5.4 Buttons
It would make more sense to change the text on the answer buttons to ‘ungrammatical’ / ‘grammatical’ rather than ‘no’ / ’yes’.
The buttons are (as usual) defined in test_page.zm. The definition of the ‘no’ button looks as follows:
ButtonGadget button1
{
    init()
    {
        text = NO_BUTTON_TEXT;
        font_family = TEST_PAGE_BUTTON_FONT_FAMILY;
        font_size = TEST_PAGE_BUTTON_FONT_SIZE;
        fill_pattern_color = TEST_PAGE_BUTTON_COLOR;
        text_color = TEST_PAGE_BUTTON_TEXT_COLOR;
        size = 150, 75;
    }

    on_event:activate()
    {
        response.process_hit(0, event_time);
    }
}
The line that specifies the text on the button is marked in orange. The variable text is set to the value of the variable NO_BUTTON_TEXT, which is specified elsewhere. You could hunt down where NO_BUTTON_TEXT is set and change the value there, but it is easier to just change the value of text directly here.
Assignment 11:
- Replace NO_BUTTON_TEXT in button1 with “Ungrammatical”. (The quotes are needed to indicate that the value is a string).
- Also change the text for the ‘yes’ button to ‘Grammatical’.
- Adapt the size of the buttons as needed to make the button text fit.
You should now have a working grammaticality judgment experiment that has two answering options. We would like to have more answering options, though (it is generally thought that having participants answer on a five- or seven-point scale enables one to regard the response variable as a continuous variable, which broadens the options for statistical analysis). We will start by adding just one button right now and see how that works.
Below is the code for one of the buttons as you currently have them in your experiment:
ButtonGadget button1
{
    init()
        {
            text = "Ungrammatical";
            font_family = TEST_PAGE_BUTTON_FONT_FAMILY;
            font_size = TEST_PAGE_BUTTON_FONT_SIZE;
            fill_pattern_color = TEST_PAGE_BUTTON_COLOR;
            text_color = TEST_PAGE_BUTTON_TEXT_COLOR;
            size = 250, 75;
         }

         on_event:activate()
         {
             response.process_hit(0, event_time);
         }
}
The button is called button1, and its code consists of two parts: a part that defines the look of the button (marked in blue), and a part that specifies what happens when the button is pressed or clicked (marked in green) – it basically says that when the button is activated, the response value 0 and the time are passed to a function called response.process_hit().
Assignment 12:
- Add a button2 to the answering options, with ‘Neutral’ as the text and ‘1’ as the response value. Name the ‘grammatical’ button button3, and change its response value to 2.
- Run the experiment to check how it looks; if the buttons are too big to fit on the screen now, make them smaller.
- Check the output: run the experiment, making sure to give each answer (grammatical, ungrammatical, neutral) at least once in the test phase.
Run the experiment until the end (the output is saved only at the end of the experiment). - Check the output to see that you do indeed get the response values 0, 1 and 2 in there. You can use the procedure you followed in Assignment 2 to look at the output.
Tip: Alternatively, you can typezepdb2dump -tbl
in the console to check the output. This will show you the data in a semi-raw format in the console.
The output is not quite as easy to read in this format, but it does save you the hassle of having to write the output to a .csv-file and then opening the .csv-file, so it can be quite useful to quickly check things. For more info on the zepdb2dump utility, check out the Using Zepdb2dump page
6. Change buttons to checkbuttons
Clearly we are not going to be able to fit seven response buttons of this type on the screen, and it would be much nicer to have checkbuttons to collect the responses anyway. An experiment that uses checkbuttons to collect responses is the experiment ident_fc. You can find this experiment as Auditory Identification with Forced-Choice Response on the beexy website. Download it from there and unzip it.
- Run the ident_fc experiment to see how it works (navigate to the folder, double-click linux-terminal.sh and click Run in Terminal – or use
chmod +x linux-terminal
again if necessary – and type zep ident_fc.zp in the console that opens).
- Note: unfortunately, if you’re working on a computer without sound you won’t be able to hear the actual stimuli – just imagine that in this experiment, after the fixation cross disappears, a sound is played that sounds somewhere between ‘ba’ and ‘da’; the task is to indicate on the scale how close the sound is to ‘ba’ or ‘da’.
- Pay special attention to the look and behavior of the radio buttons.
What happens when you try to select more than one value?
We’re going to try to make the response part of the test page look like this (where the o’s represent radio buttons – we will refer to them as check buttons in the rest of the tutorial since that’s what the ZEP code does):
Ungrammatical o o o o o o o Grammatical
—–
| Next |
—–
We’ll be stealing some code from the ident_fc experiment to make that happen, step by step.
Assignment 13:
- Close all open experiment files and console windows.
- Create a copy of your GrammJudg3btn folder and rename the copy to GrammJudg7chkbtn.
Rename the ZEP script in this new folder to GrammJudg7chkbtn.zp, open it in Gedit Text Editor and adapt its FILE and HISTORY info. Open test_page.zm from the GrammJudg7chkbtn experiment, and test_page.zm from the ident_fc experiment.
Tip: to distinguish which test_page file is which, hover your mouse over the file’s tab in Gedit Text Editor to show the full path to the file.In ZEP-Auditory-Identification-with-Forced-Choice-Response-master/test/test_page.zm, search for the text ‘CheckButtonGadget’. You will see that the first checkbutton is defined as follows:CheckButtonGadget button1 { init() { check_box_color = TEST_PAGE_CHECK_BOX_COLOR; symbol_alignment = ALIGN_CENTER; symbol_size = 20; } }
In GrammJudg/GrammJudg7chkbtn/modules/test_page.zm, the first button is defined as follows:
ButtonGadget button1
{
      init()
           {
                   text = "Ungrammatical";
                   font_family = TEST_PAGE_BUTTON_FONT_FAMILY;
                   font_size = TEST_PAGE_BUTTON_FONT_SIZE;
                   fill_pattern_color = TEST_PAGE_BUTTON_COLOR;
                   text_color = TEST_PAGE_BUTTON_TEXT_COLOR;
                   size = 250, 75;
            }

             on_event:activate()
            {
                  response.process_hit(0, event_time);
            }
}
Compare the blue text and observe the differences: the initialization of the checkbutton in the ident_fc experiment involves defining the size of the check button, and its alignment. The initialization of the button in the experiment we’ve been working on, involves defining aspects of the text on it, its color and size.
In addition, as we have already seen, the button in the GrammJudg7chkbtn experiment involves an ‘activate’ event – when the button is pressed, the response value and the time are passed to a function response_process_hit. Since we are going to (later) build a ‘Next’ button that does this, we don’t need the check button to do this, so we can take the green part out.
- Change ButtonGadget to CheckButtonGadget for all three buttons in GrammJudg7chkbtn’s test_page.zm.
- Also take out the ‘on_event:activate’ part from the three buttons (i.e. the part that is marked in green above).
- Change the blue ‘init’ part in the GrammJudg7chkbtn experiment to the blue ‘init’ part from the ident_fc experiment as it is given above. Do this for all three buttons.
- Run the experiment; click on several of the answering options. (Use Alt-F4 to close the experiment after you’ve done that).
- The checkbutton that you made now doesn’t behave or look at all like the checkbuttons in the ident_fc experiment; describe the differences in looks and behavior in the answering sheet.
It seems like we need to tell the check buttons that they’re all part of a group, to make them behave properly. You can see how this is done by scrolling down to look at the definition of the second button in the ident_fc test_page.zm: we need to make button 2 ‘join’ button 1, and button 3 needs to ‘join’ button 2.
Assignment 14:
- Make that happen, and run the experiment again.
- What has changed in the behavior of the check buttons?
We now have well-behaving check buttons, but no way to proceed to the next stimulus. To do that, we need to build a ‘Next’ button just like in the ident_fc experiment. The Next button in the ident_fc experiment is defined as follows:
ButtonGadget ok
{
    init()
    {
        text = NEXT_BUTTON_TEXT;
        font_family = TEST_PAGE_BUTTON_FONT_FAMILY;
        font_size = TEST_PAGE_BUTTON_FONT_SIZE;
        fill_pattern_color = TEST_PAGE_BUTTON_COLOR;
        text_color = TEST_PAGE_BUTTON_TEXT_COLOR;
    }

    on_event:activate()
    {
        // Check if a selection has been made (-1 if not).
        int btnnum =
            checkbuttons.button1.selected_button_in_group;
        if (btnnum >= 0)
            response.process_hit(btnnum + 1, event_time);
    }
}
We will now insert this ‘Next’ button into our experiment, doing some preporatory work first:
Assignment 15:
- Placement of the ‘Next’ button: ZEP gives you complete control over where every element in test_page.zm shows up on the page, which means that you have to think about these things.
- In the test_page of GrammJudg7chkbtn, the layout of the buttons is defined like so:
HorizontalLayout buttons
{
       init()
       {
              spacing = 50;
              options = LAYOUT_EQUAL_WIDTH;
       }

       ... (lots of code specifying the buttons)
}
This means that the spacing between the buttons is 50 pixels, and that the elements in the HorizontalLayout will all have the same width (namely the width of the widest element).
- Change HorizontalLayout buttons to HorizontalLayout checkbuttons (since we changed the buttons to checkbuttons)
- Find the matching end bracket for the HorizontalLayout and copy the code for the ‘Next’ button after that, to make the ‘Next’ button appear below the row of check buttons (outside the scope of HorizontalLayout).
- Run the experiment to check that that worked.
You will see that mostly, the checkbuttons do now work as we want, but the checkbutton selection of the previous stimulus is carried over to the next stimulus. This did not happen in the ident_fc experiment, so apparently we need to steal some more code from there.
The procedure that clears the checkbutton selection at the end of the stimulus in ident_fc is the line marked in green in the reset function (search for ‘void reset’ in ident_fc’s test_page.zm):
void reset()
{
       full_abort();
       checkbuttons.button1.uncheck_buttons_in_group();
}
Assignment 16:
- Copy the line marked in green to the ‘reset’ function in the GrammJudg7chkbtn. Run the experiment to check that the previous response is now indeed gone by the time the next trial appears.
The next thing that needs to be done, is to put in labels marking the left end of the checkbutton scale with ‘Ungrammatical’, and the right end of the scale with ‘Grammatical’; and of course we need to add four check buttons to get the total number of checkbuttons up to seven.
Assignment 17:
- Search the ident_fc test_page.zm for ‘LabelGadget’, and use this as an inspiration to create a label ‘Ungrammatical’. Insert the label right before your first check button, within the scope of HorizontalLayout.
- Also create a second label ‘Grammatical’ and insert it directly after your last check button (also within the scope of HorizontalLayout).
- Add four checkbuttons to get the total up to seven.
- Run the experiment; you will see that your answering scale doesn’t fit on the page. Comment out the line ‘options = LAYOUT_EQUAL_WIDTH;’ in the HorizontalLayout initialization to fix this.
- Run the experiment again to check that the buttons and labels look OK.
7. Instructions
We now have a working experiment, but the instructions are still the instructions for the visual lexical decision task we started with.
Assignment 18:
- Replace the instruction text with the following text:
Dear participant,

Thank you for participating in this experiment.

You are now going to see sentences on the screen, one
after the other. Some sentences will be perfectly
acceptable English, some will be terrible English or
a little strange. Your task is to indicate for each
sentence how well-formed you feel the sentence is.
There are no right or wrong answers, just use your
intuition.

To respond, select on the answering scale how grammatical
you feel the sentence is, and then click on Next to
proceed to the next sentence.

First we will do a short practice session.

Click Continue when you are ready to start.
For your reference, text is set in bold by enclosing it in the tags <b> and </b>, and in italics by enclosing it in the tags <i> and </i>.
8. Data
Finally, let’s look at our data and see how you could process it further.
Assignment 19:
- Run the experiment again, until the end. Give your sincere judgment on the sentences.
- Open this last session in LibreOfficeCalc (or Excel). The raw session files are located in GrammJudg7chkbtn/db/01/GrammJudg7chkbtn/test.
- Calculate the average response values for the PSYCH_MAKE_CONFLATED stimulus type and for the PSYCH_MAKE_CAUSATIVE stimulus type.
Function key cheat sheet
References
Brouwer, Siri (2011). The way idioms are stored in the mental lexicon. MA Thesis, Utrecht University.
Juffs, Alan (1996). Learnability and the Lexicon: Theories and second language acquisition research. Language Acquisition and Language Disorders 12, John Benjamins, Amsterdam/Philadelphia.