
How-tos
Auditory-Brainstep Response (ABR)
Last updated on 20 December 2023 by Charlotte Koevoets
If you have suggestions on how to improve this document, or find mistakes, please send them to ilslabs@nulluu.nl
Procedure ABR
ABR preparation: this is a special module that can be identified by having connectors on only the front panel!
- Double check the ABR module (amplifier) is in speedmode 9.
- Clean the skin with alcohol in the following places:
- behind the left ear (ref L)
- behind the right ear (ref R)
- above left eye (CMS/DLR)
- above right eye (DLR/CMS)
- put a small alcohol soaked cotton on the head on equal distances from nasion and inion and equal distance from the left and right ear (Cz)
- Collect the special 3 ABR cable and the CMS+DLR cable.
Check that the electrodes are clean. There should be no left-over gel on any of the electrodes.
- Hang the electrode cords from your neck to make sure they don’t touch the floor.
- Don’t ever let the electrodes touch metal; take off your own jewelry!
- Don’t pull the electrode cords; always handle the electrodes carefully by their plastic casing.
- When sticking on the face electrodes keep in mind that the actual electrode is slightly off-center.
- Put the electrode stickers on the flat-type electrodes. Make sure the tip of the stickers are aligned with the wire of the electrodes; they will be easier to apply and less likely to fall off this way.
- First place the CMS and DLR electrode and connect them to the module.
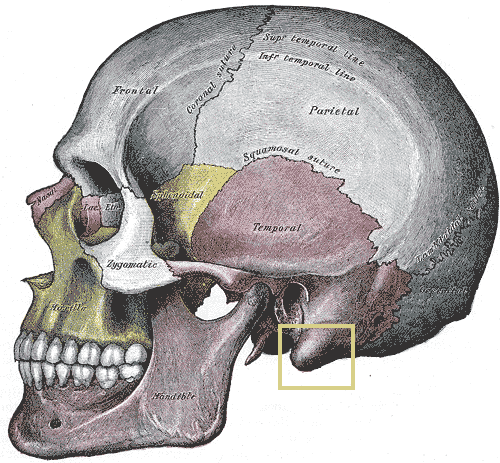
- Get the ‘Left’ and ‘Right’ electrodes and put a small jot of gel on them. Put them behind the left ear and the right ear on the skin covering the bony part of the skull. This bony part is called the mastoid and the exact location differs from person to person so be sure to check. These electrodes will generally be used to pickup brain-step signals so placing them correctly is of substantial importance.
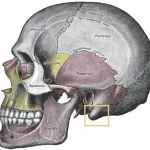
- Here the bone procession is highlighted.
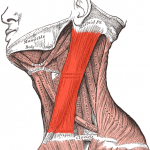
- The sternocleidomastoideus is the muscle you want to avoid putting the electrodes on. Source: Anatomy of the Human Body, 1918, H. Gray.
- Next, place the Cz electrode. This one is most difficult since it’s connection is made difficult due to the presence of hair. An alternative location is F1.
- The blue LED on the amplifier should have stopped blinking now. If not: there is likely something wrong with the CMS/DLR.

Check the signal:
- Start ActiABR-200 (shortcut should be on the desktop).
- At startup you get to select your own configuration. Do one of the following:
- Select the default cfg files (
C:\Program Files (x86)\BioSemi\ActiABR200\BioSemi_ABRdefault.cfg). - Select a .cfg file from the configuration folder (
Desktop\Actiview Configurations\). - Or, write and select your own.
- Select the default cfg files (
- At the left lower corner you should be able to view the offsets of the left, right, and active electrode. Use the ?electrode offset? to check the electrode connection of the electrodes. They should be below (+/-) 20mV ideally but (+/-) 40 mV is still feasible.
- If the offset for a certain electrode is too high, try pushing on the electrode a bit. If this does not help, re-apply the electrode after removing it and cleaning the site.
- In case of weird signals, check this document to get an idea of what the problem is.
- Unlike the normal EEG the amount of recorded channels are number of ‘recording’ electrodes minus one. This is because the ABR module automatically references the left and right electrode to the reference (Cz).
Start measuring:
- Show the participant the signal and explain what different artifacts like a blink or a swallow can do to the signal. Explain when blinks are least wanted.
- Test the intercom. Press 2 to turn on the intercom. Get the participant some water if you haven’t already. Switch off the airco if you have it running.
- Go to the ‘Monopolar Display & Triggers’ tab, click on ‘Start’.
- You will now see the lines of the electrodes. If they are flat, the electrodes are not registering anything. Make sure the electrodes are connected properly. Change the Trigger Format to decimal so that you can easily track where the participant is in the experiment by looking at the number codes. Next click ‘Start File’.
- In the ‘Select Save Options’ make sure the correct electrodes are selected (for 64 this is A + B), and the ‘Add 8 EX electrodes’ if applicable.
- In the ‘Enter Local Subject Identification’ box enter the subject code.
- In the ‘Enter Local Recording Identification’ box enter your capital initials (of the researcher). Press OK.
- Enter a location and filename for your data; use the same subject code. If possible save under your own user account (
D:/Users/[your username]/) so the files are registered to be yours. -
Click ‘paused‘ to start measuring(!)
- Check that there is a green button that says ‘saving’. Now you are measuring.
- Start your Presentation experiment from the ‘Main’ tab.
- Select the scenario you want to run: make sure you have the correct number for that participant.
- Click ‘Run’ to start the experiment.